How to Use the HydroServer Streaming Data Loader
This guide explains how to use the HydroServer Streaming Data Loader to upload data from a comma-separated values (CSV) file into HydroServer.
Many dataloggers and proprietary sensor/datalogger communication software programs download data to CSV files. The Streaming Data Loader is a desktop software application that helps you load time-series data, such as discharge, streamflow, temperature, or other sensor data, from a CSV file on your computer into a HydroServer datastream.
Before using the Streaming Data Loader, make sure you already have:
- A HydroServer workspace set up in a HydroServer instance. You can do this via the HydroServer Data Management App.
- A monitoring site created in HydroServer.
- One or more datastreams created in HydroServer for the data you want to upload from a CSV file.
1. Download and Install the Streaming Data Loader
Go to the Streaming Data Loader release page: https://github.com/hydroserver2/streaming-data-loader/releases
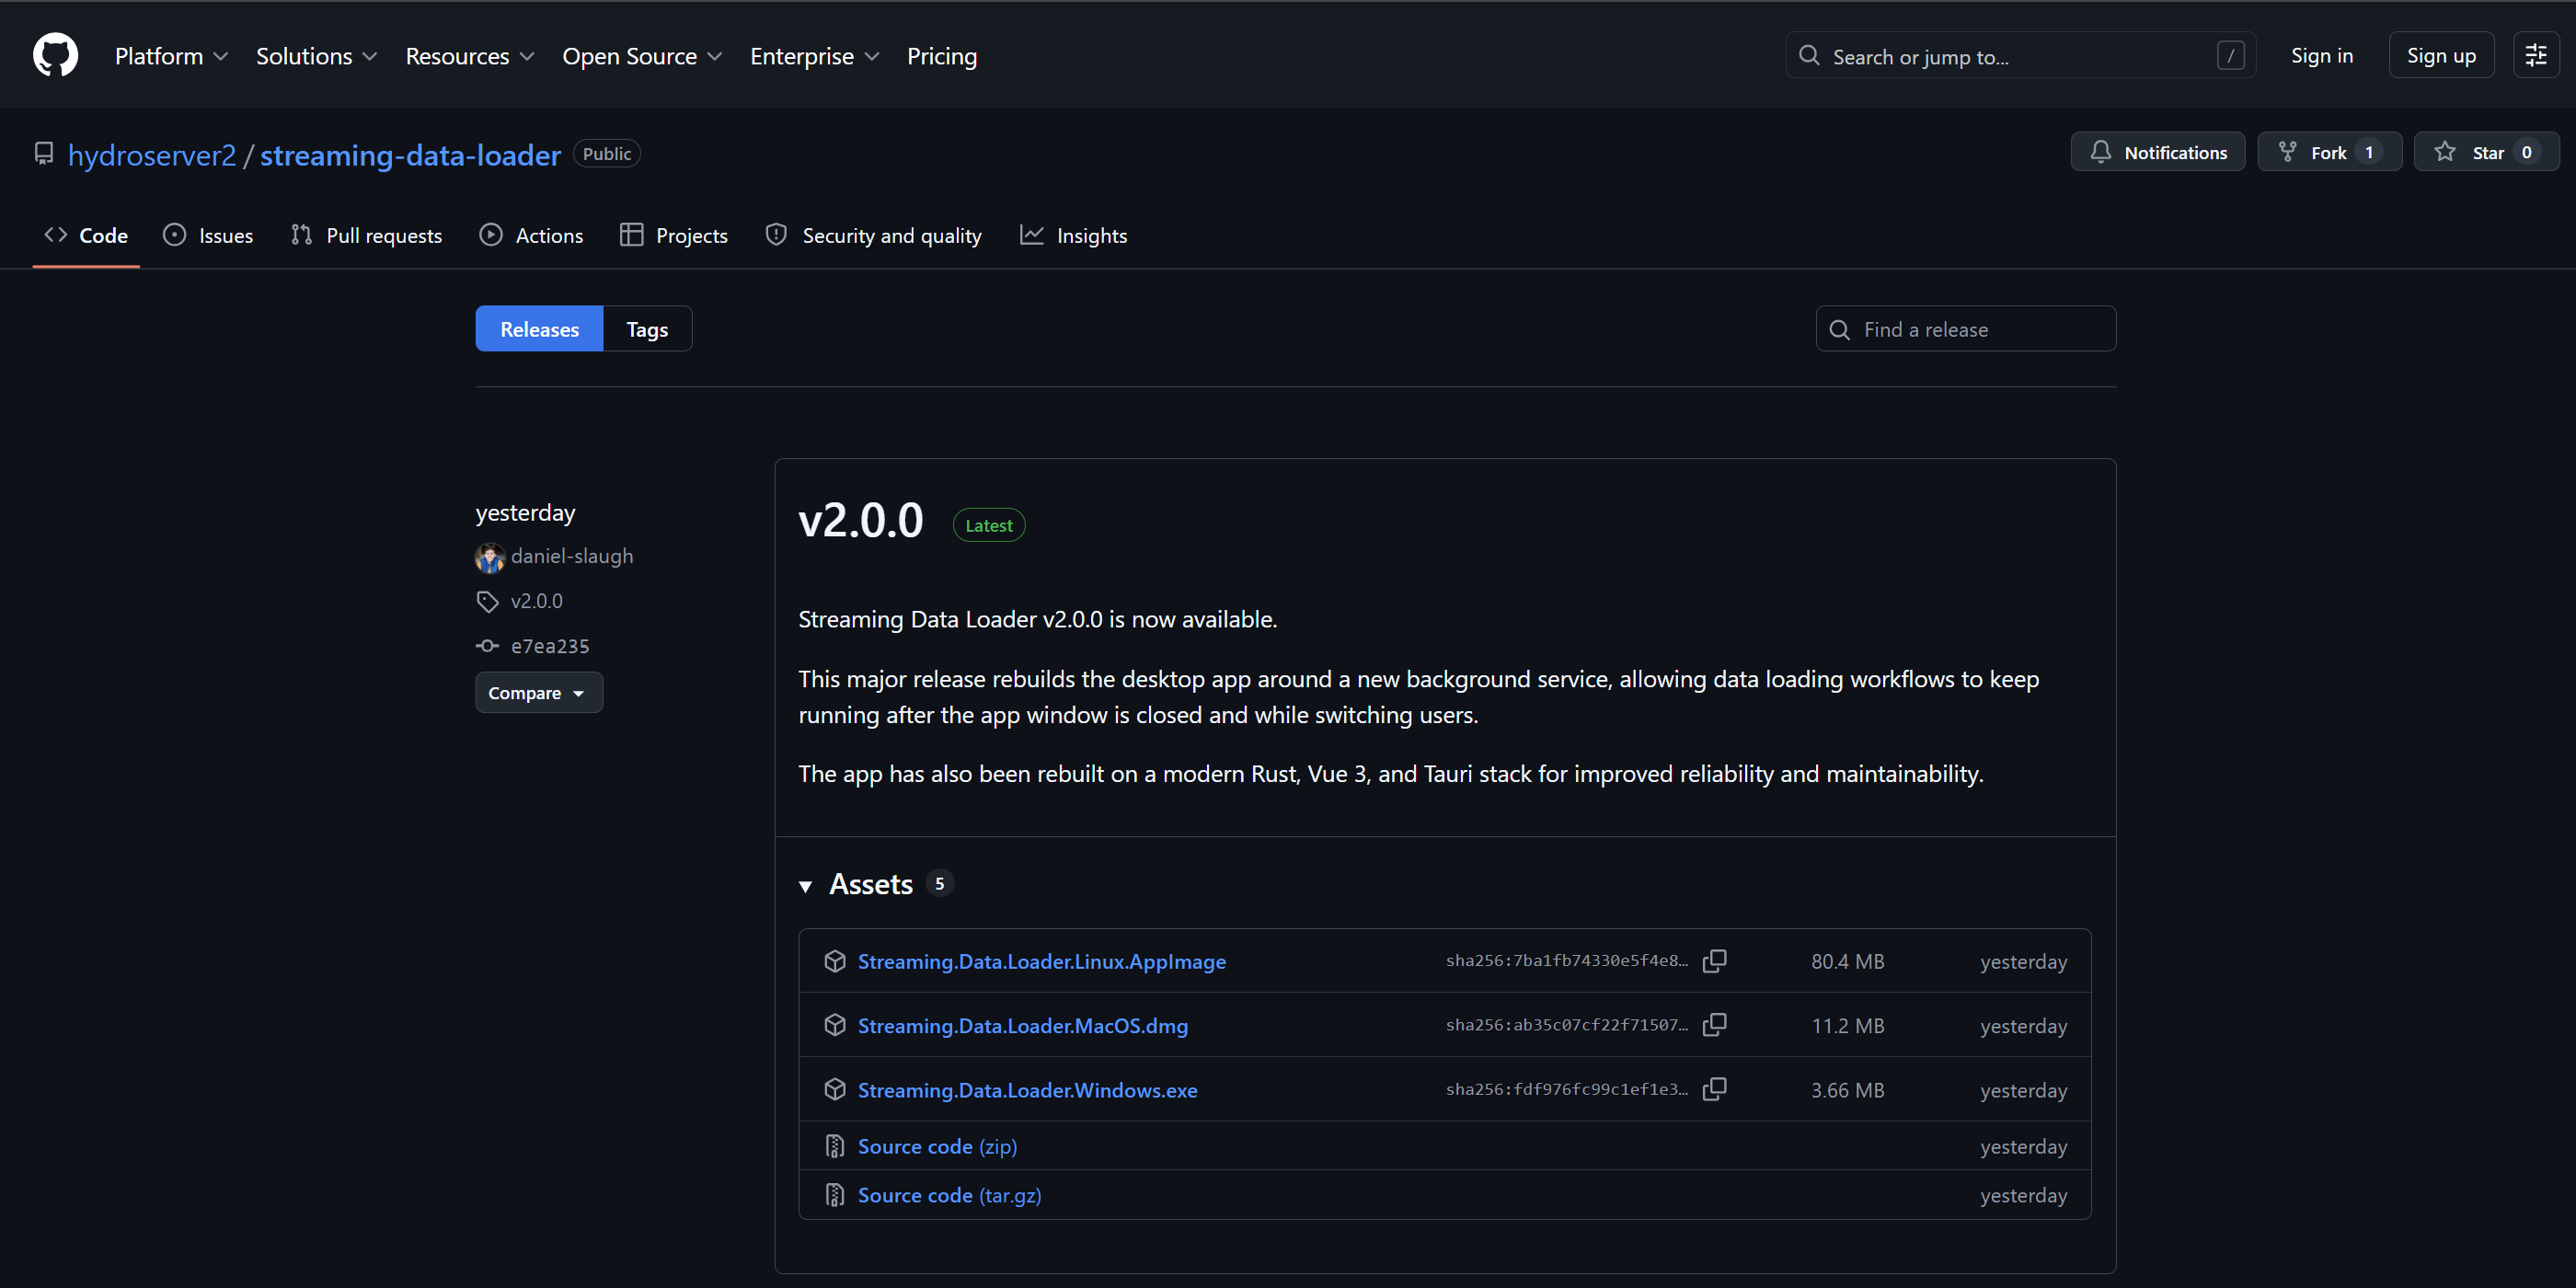
Download the correct installer marked as "Latest" for your operating system:
- Windows
- macOS
- Linux
After downloading the file, follow the installation instructions in Install the Streaming Data Loader.
2. If You Get a Warning
On Windows, you may see a warning message that says:
Windows protected your PC
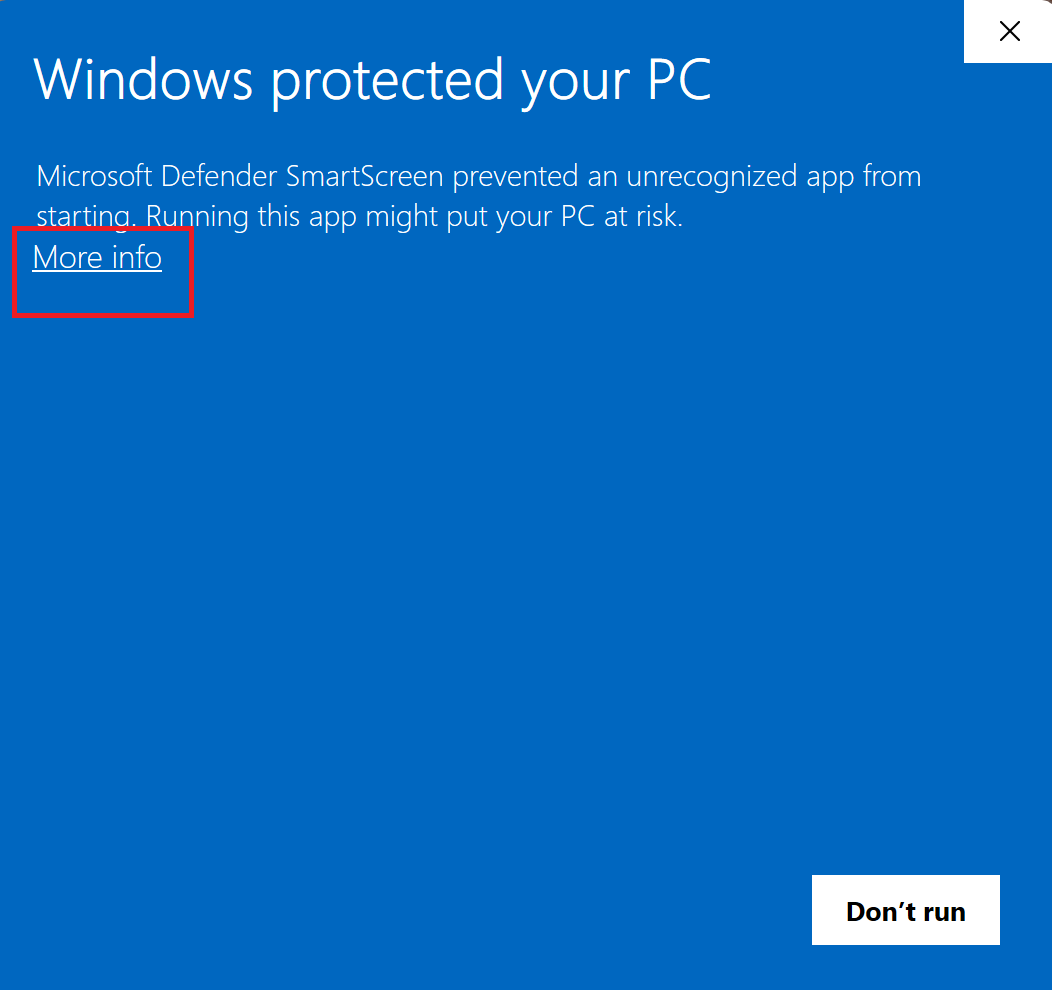
If this happens:
- Click More info.
- Click Run anyway.
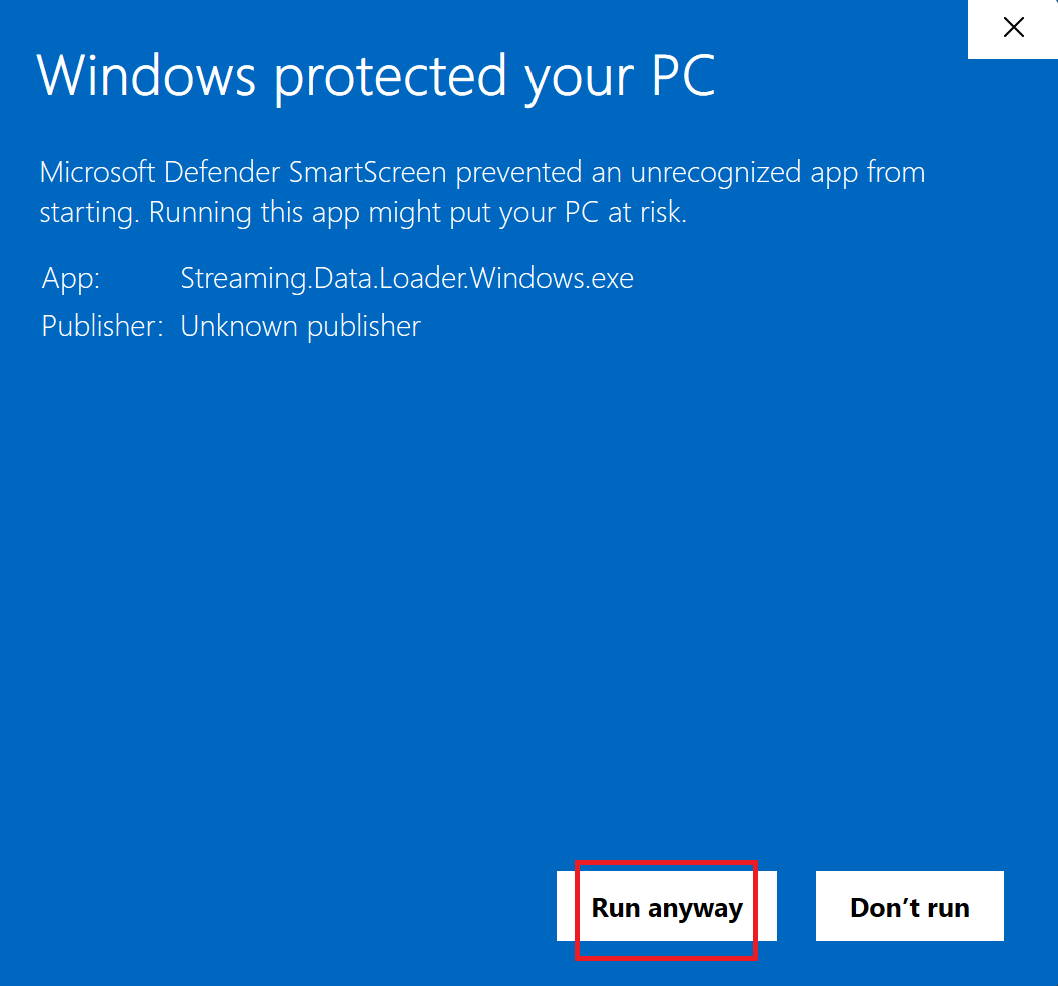
- Continue installing the application.
After installation, you can right-click the app and choose Pin to Taskbar if you want to open it more easily later.
On Mac, you may get a warning when you try to run the app that says:
Streaming Data Loader.app Not Opened. Apple could not verify "Streaming Data Loader.app" is free of malware that may harm your Mac or compromise your privacy.
If this happens, you will need to do the following:
- Open System Settings.
- Click Privacy & Security.
- Scroll down and click the "Open Anyway" button next to the message that says the Streaming Data Loader application was blocked.
- In the window that pops up, click the "Open Anyway" button.
3. Install the Background Process
After the Streaming Data Loader is installed, open the application. The app may ask you to install a background service.
Click: Install Background Service
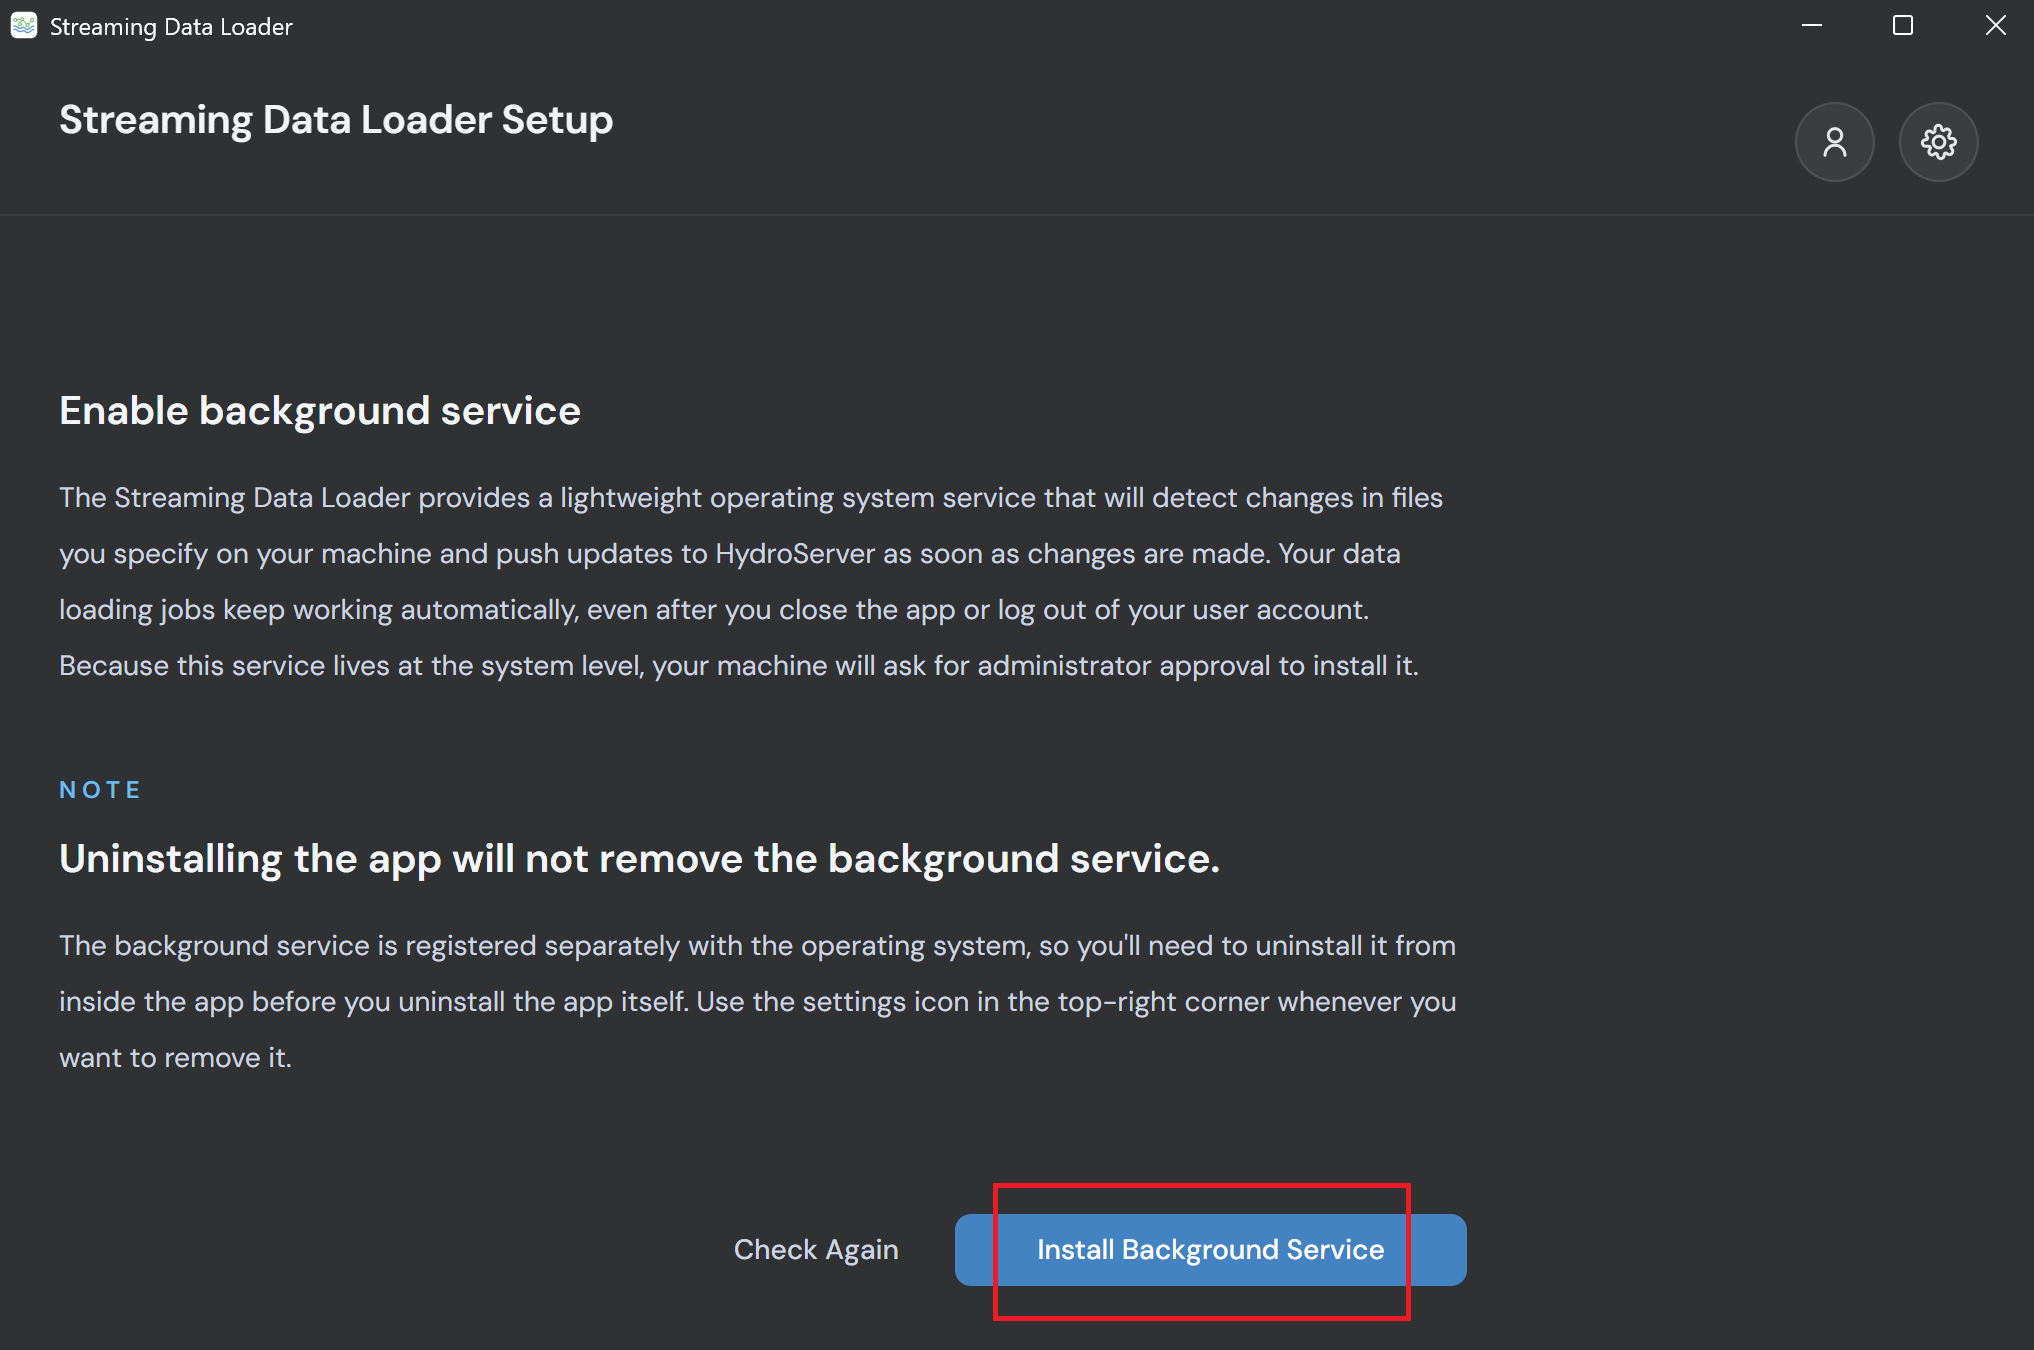
The background process allows the Streaming Data Loader to keep checking your CSV file and automatically upload new data rows when they are added to the CSV file. The Streaming Data Loader doesn't run on a schedule. It continuously monitors whatever CSV files you set up, and any time there are changes to those files, it parses the file, looks for new data to load, and uploads it to HydroServer.
4. Connect the App to HydroServer
Before uploading data, you need to connect the Streaming Data Loader to HydroServer.
You can connect by using either:
- Your HydroServer username and password
- An API key
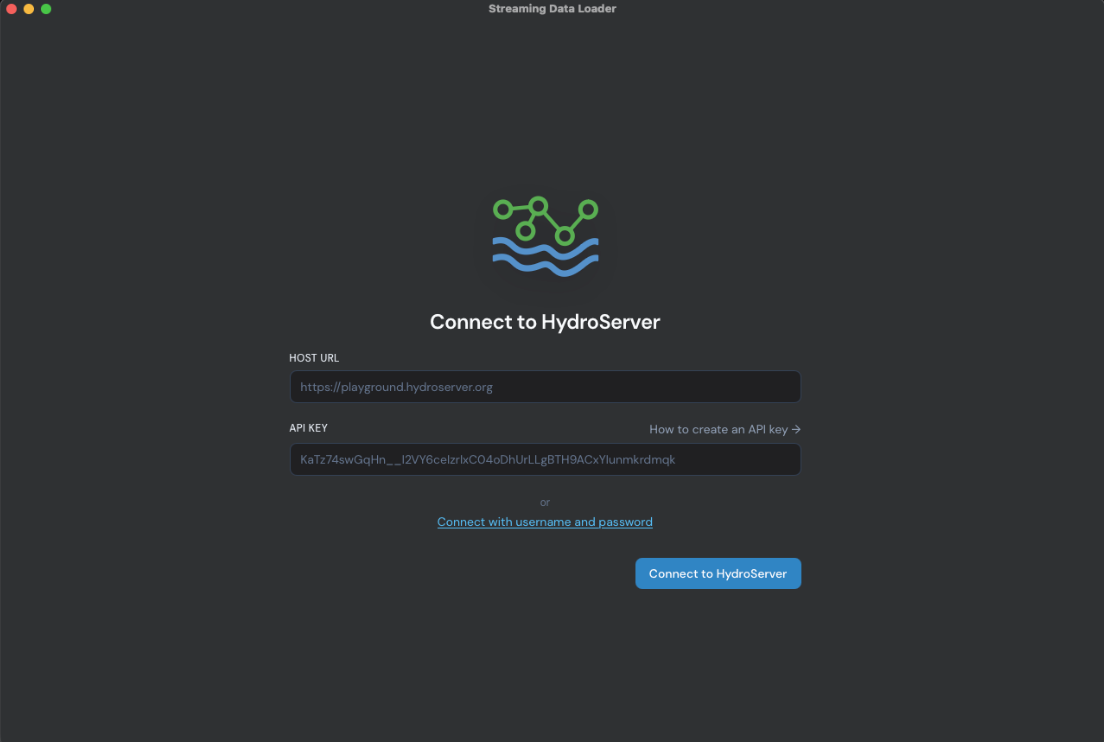
Using an API key is recommended because it gives the app only the permissions it needs to upload data.
You will need:
- The HydroServer website address.
- An API key created for your workspace in the Data Management App.
Example HydroServer address:
https://playground.hydroserver.orgPaste the website address into the Host URL box. Then paste your API key into the API Key box. Click: Connect to HydroServer
5. Create an API Key in HydroServer
An API key works like a secure password that allows the Streaming Data Loader to upload data to your HydroServer workspace. It can limit access to loading data only, whereas your username and password could be used to edit many other things. This is why we recommend using an API key with the Streaming Data Loader.
To create an API key for the Streaming Data Loader:
- Open the HydroServer Data Management App website.
- Go to Your sites.
- Click Manage workspaces.
- Find your workspace in the table.
- Click the lock icon.
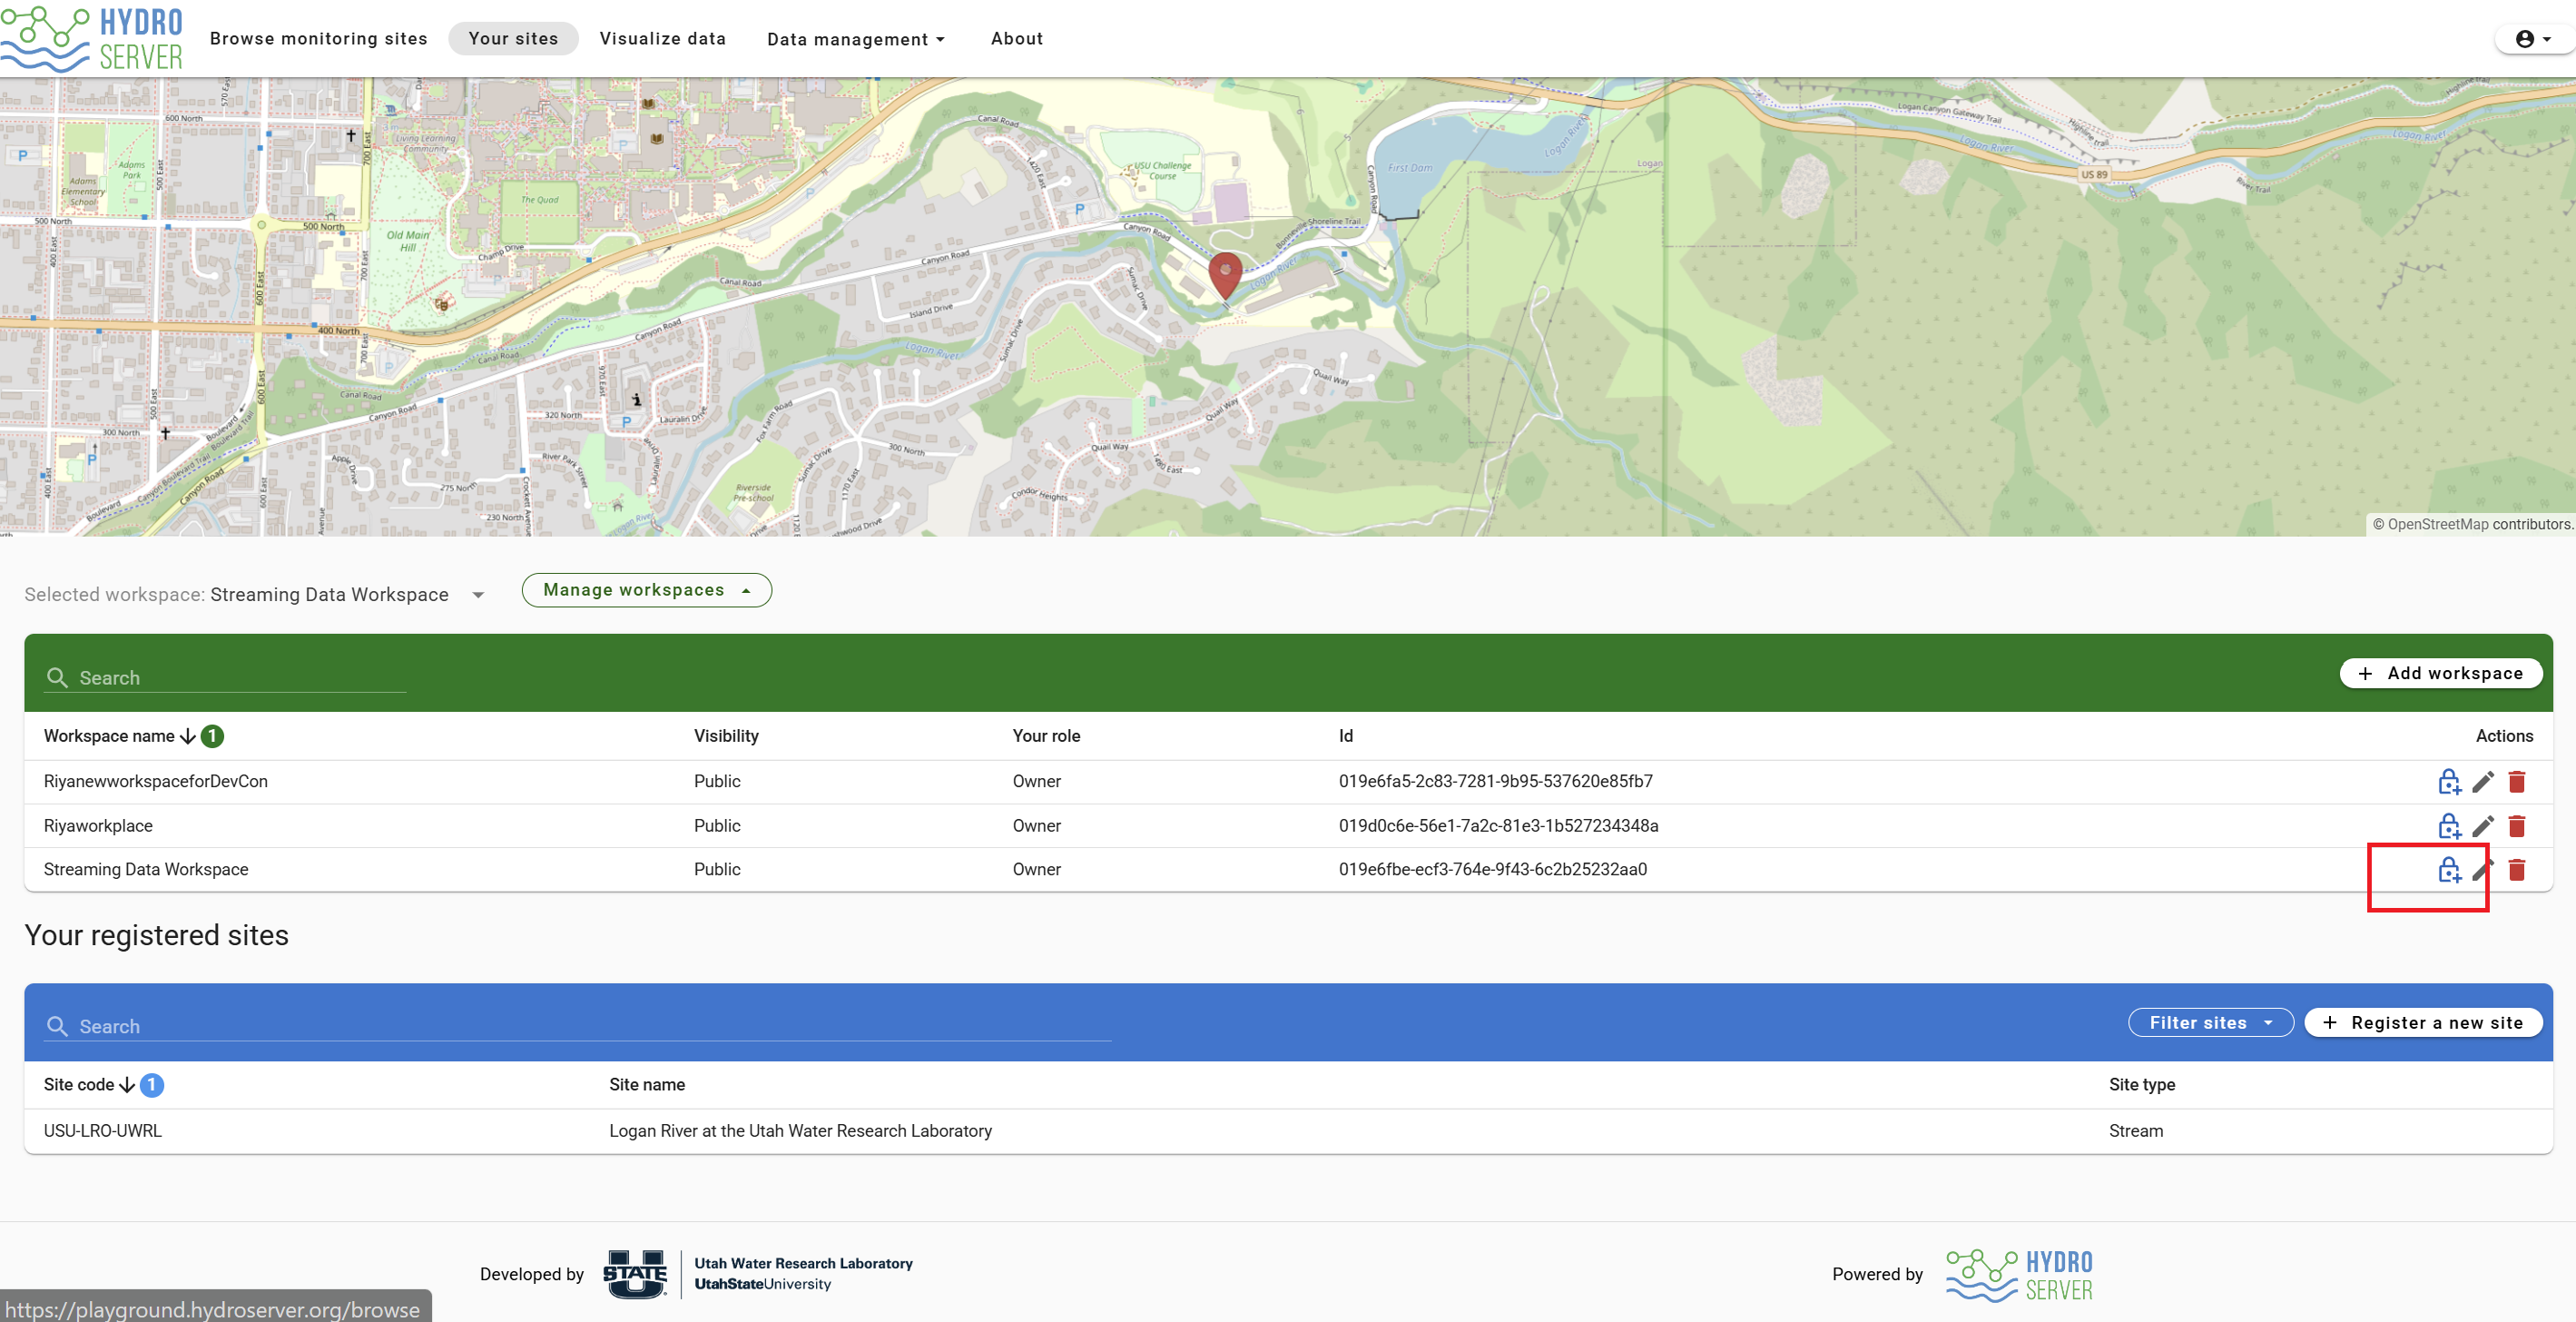
- Click API keys.
- Click Create API key.
- Give the API key a name (something like 'Streaming Data Loader').
- Add a short description (something like 'API Key for Streaming Data Loader').
- Select the role as Data Loader.
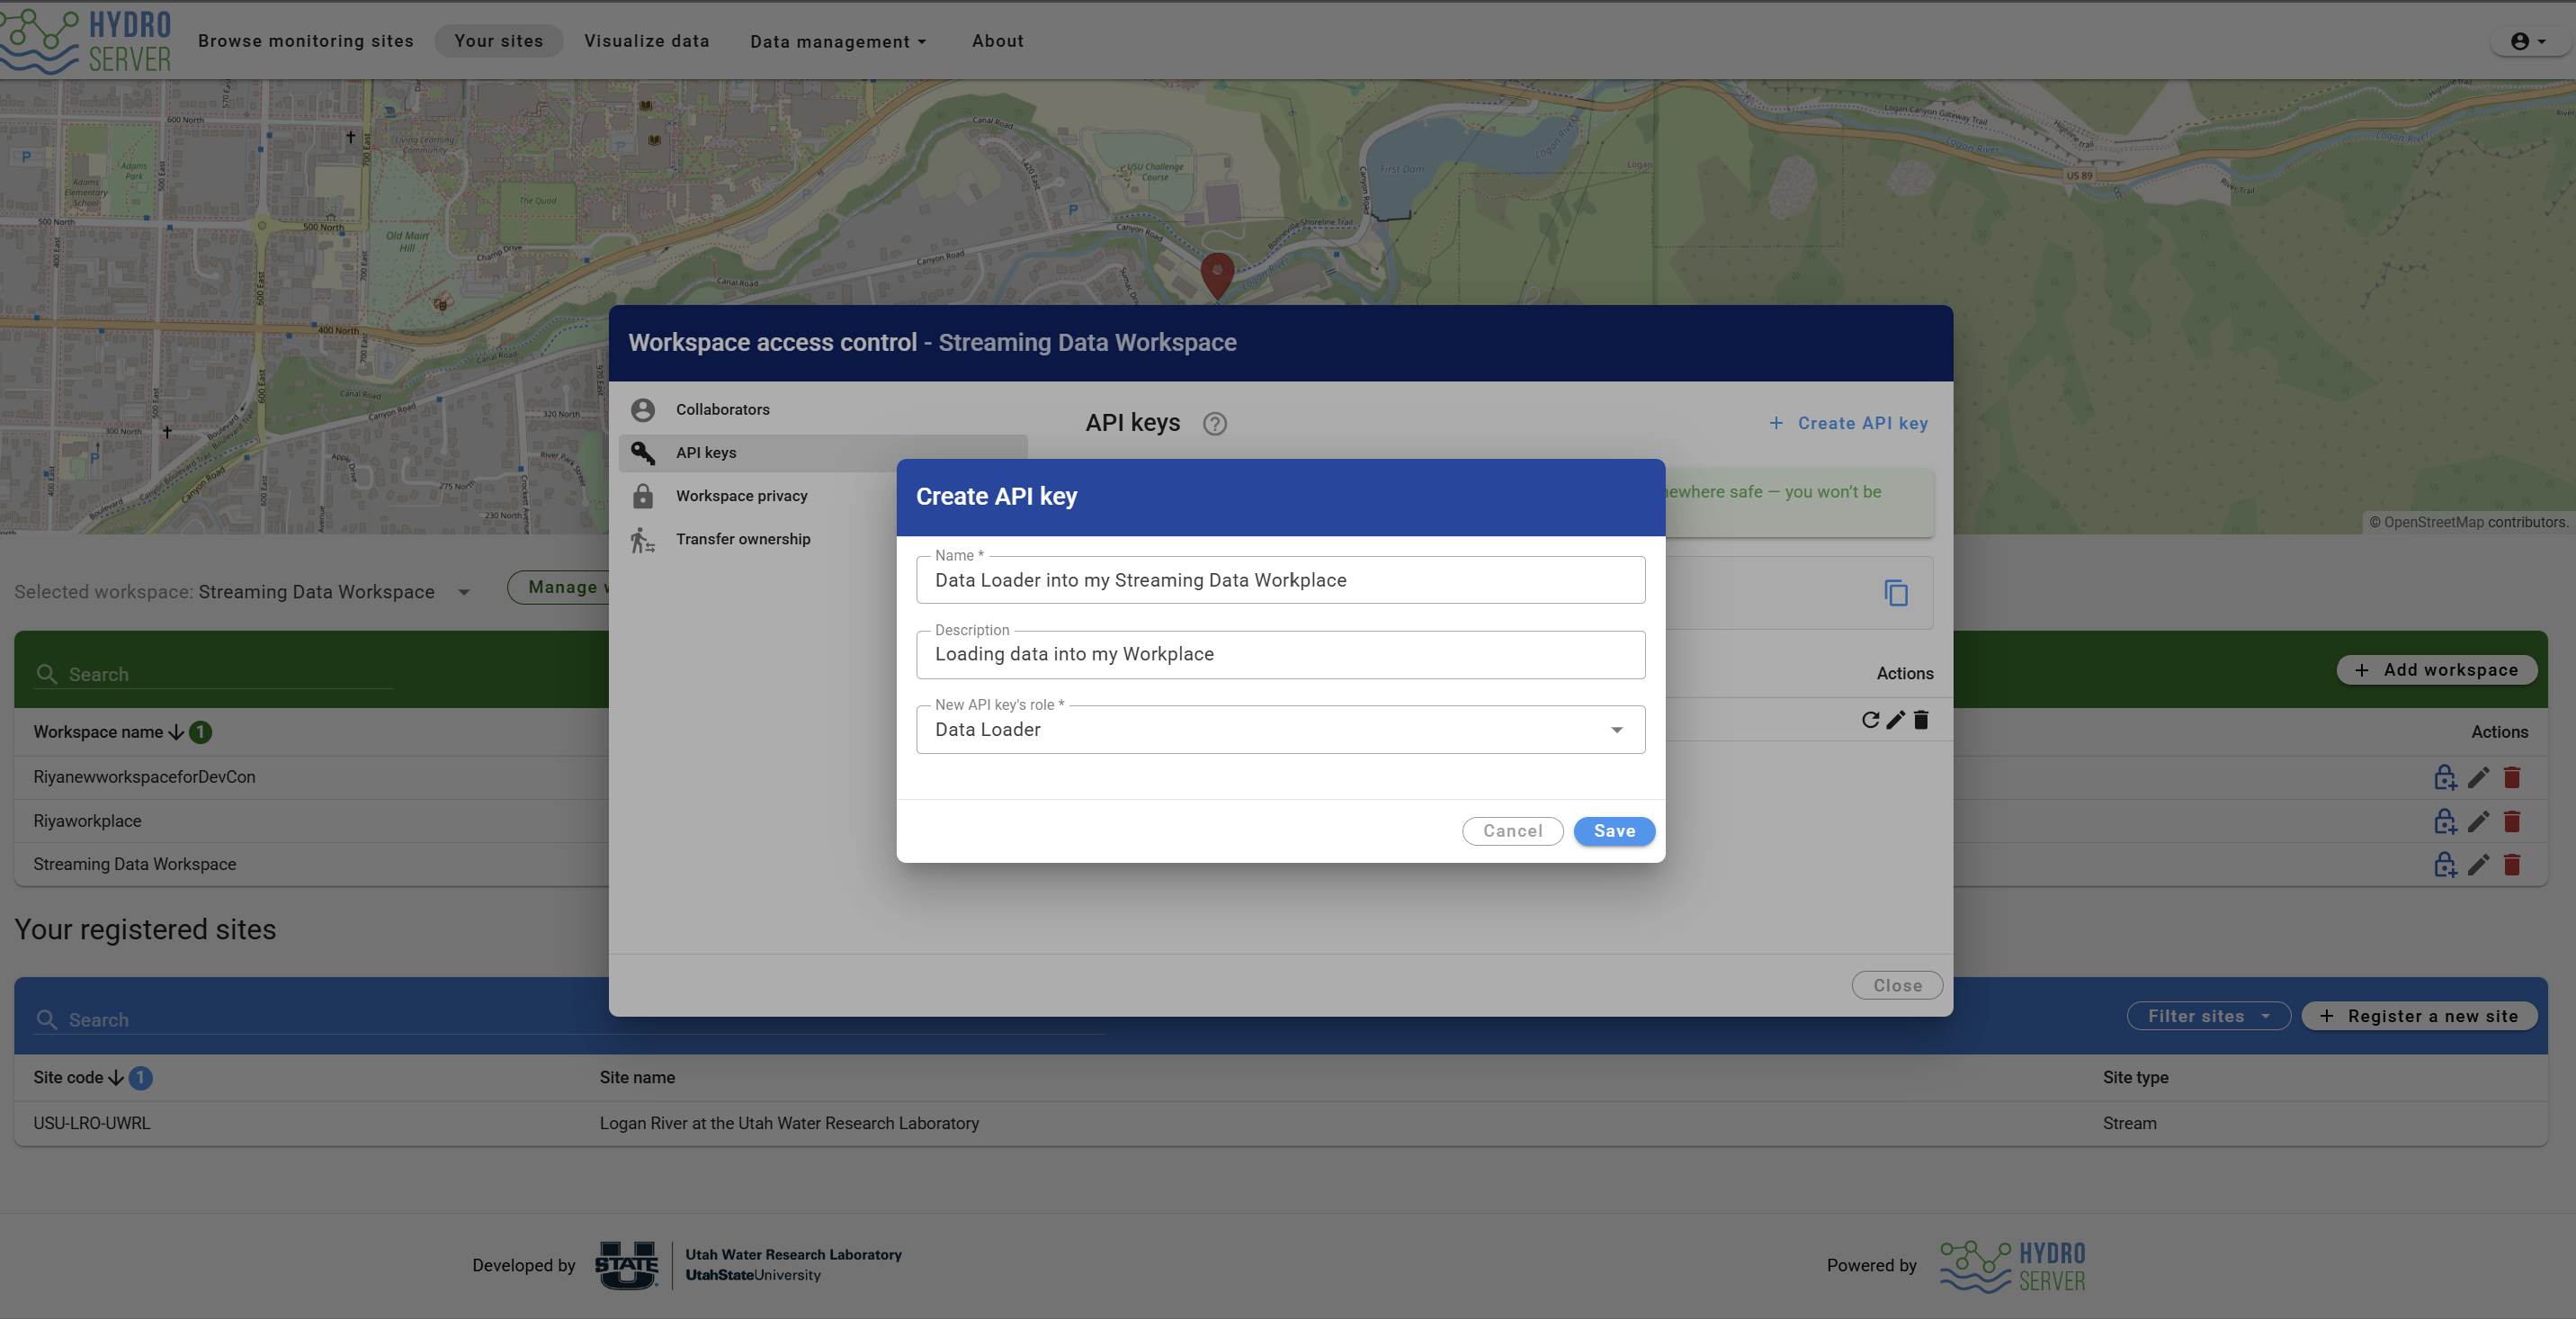
- Click Save.
- Copy the API key.
IMPORTANT: Save the API key somewhere safe. After you close the window, HydroServer will not show the value for the API key again. If you lose the API key, you can create a new one.
6. Prepare the CSV File to Be Loaded
Before selecting the CSV file, make sure the file is saved in a location on your computer that the Streaming Data Loader can access. A good folder location is important because the Streaming Data Loader may run as a background service.
Examples of good places to store the CSV files to be loaded include:
Windows
C:\sdl\data\or
C:\ProgramData\sdl\data\macOS
/Users/Shared/sdl/dataLinux
/var/sdl/data⚠️ Avoid These File Locations
Do NOT save your CSV files in:
- Desktop
- Downloads
- Documents
- Temporary folders
- Program Files
- Cloud folders such as OneDrive, Dropbox, or Google Drive
These locations may cause permission issues or make it harder for the Streaming Data Loader to detect file updates correctly.
7. Choose the CSV File
In the Streaming Data Loader, click: Choose CSV File
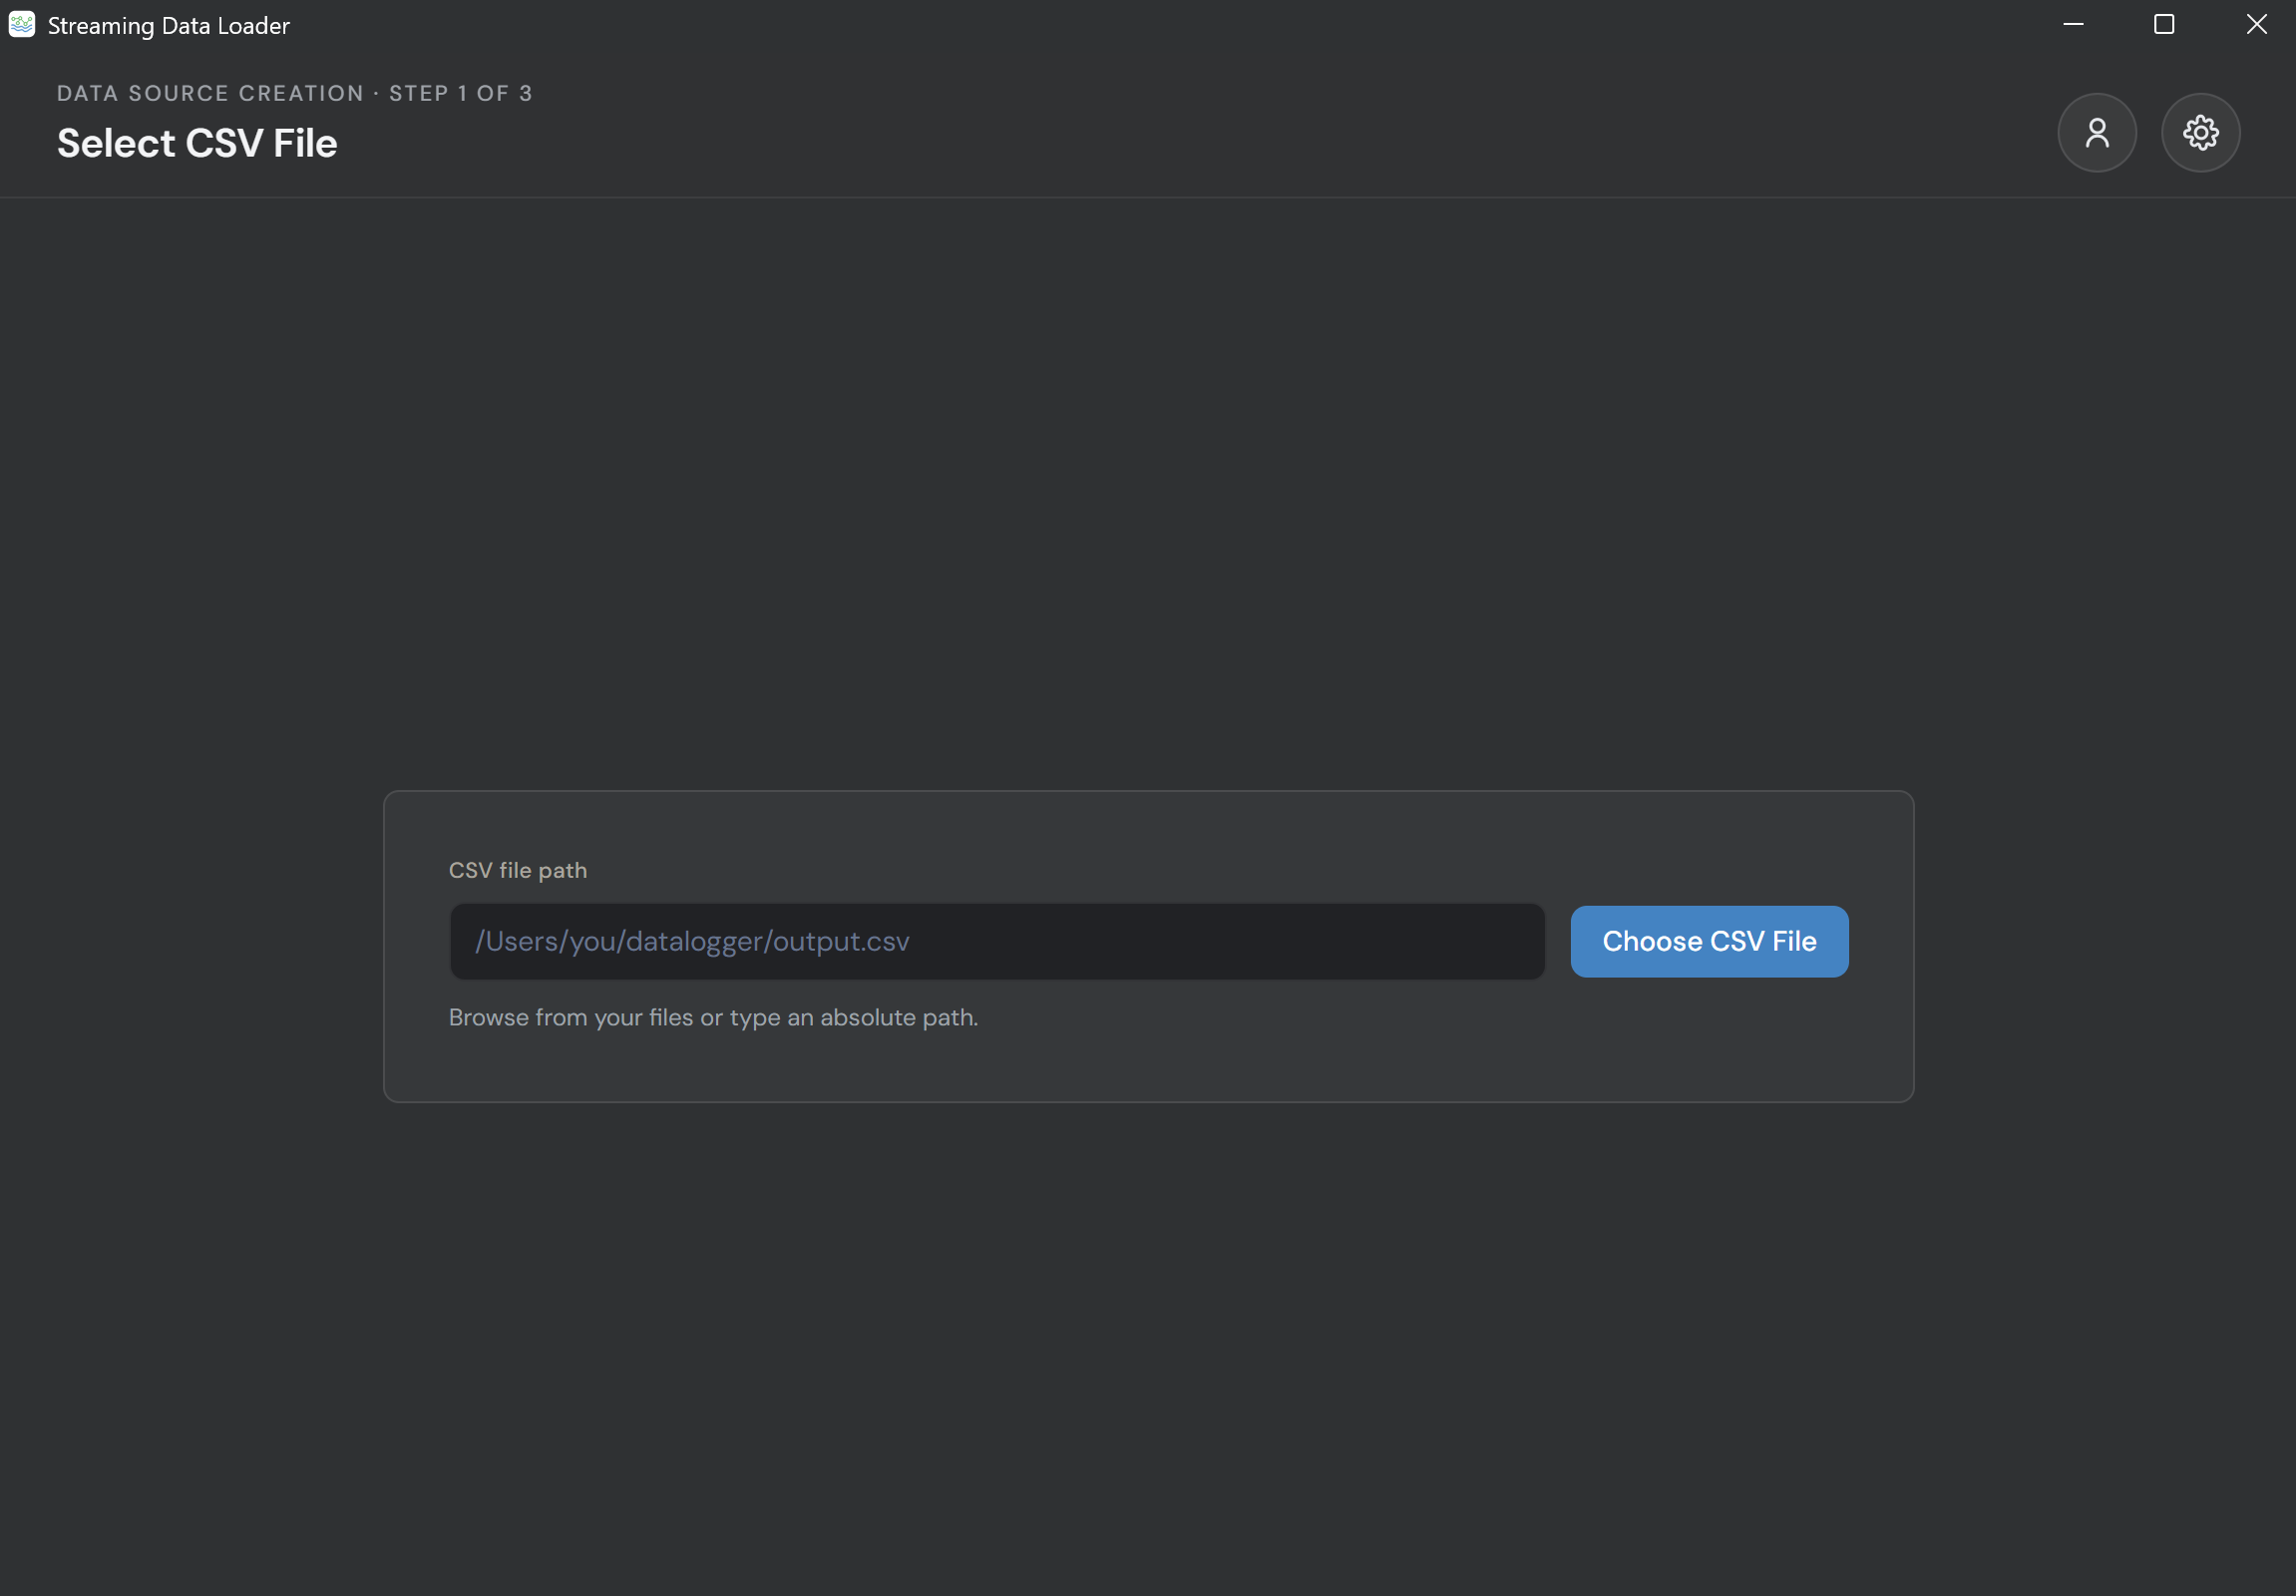
Then select the CSV file you want to configure from your computer. A typical CSV file may look like this:
timestamp,max_temp_c,min_temp_c
2025-03-23T00:00:00Z,11.7,-1.5
2025-03-24T00:00:00Z,8.4,-2.0
2025-03-25T00:00:00Z,10.9,-2.2
Your CSV file should usually include:
- A single column containing the timestamp for each row.
- One or more data value columns representing datastreams to be loaded.
For example, if you are uploading discharge data, your CSV file should include a timestamp column and a discharge value column.
8. Set Up the CSV File
After selecting the CSV file, the app will show a setup page. This page tells the Streaming Data Loader how to read your CSV file. Check each of the following settings carefully.
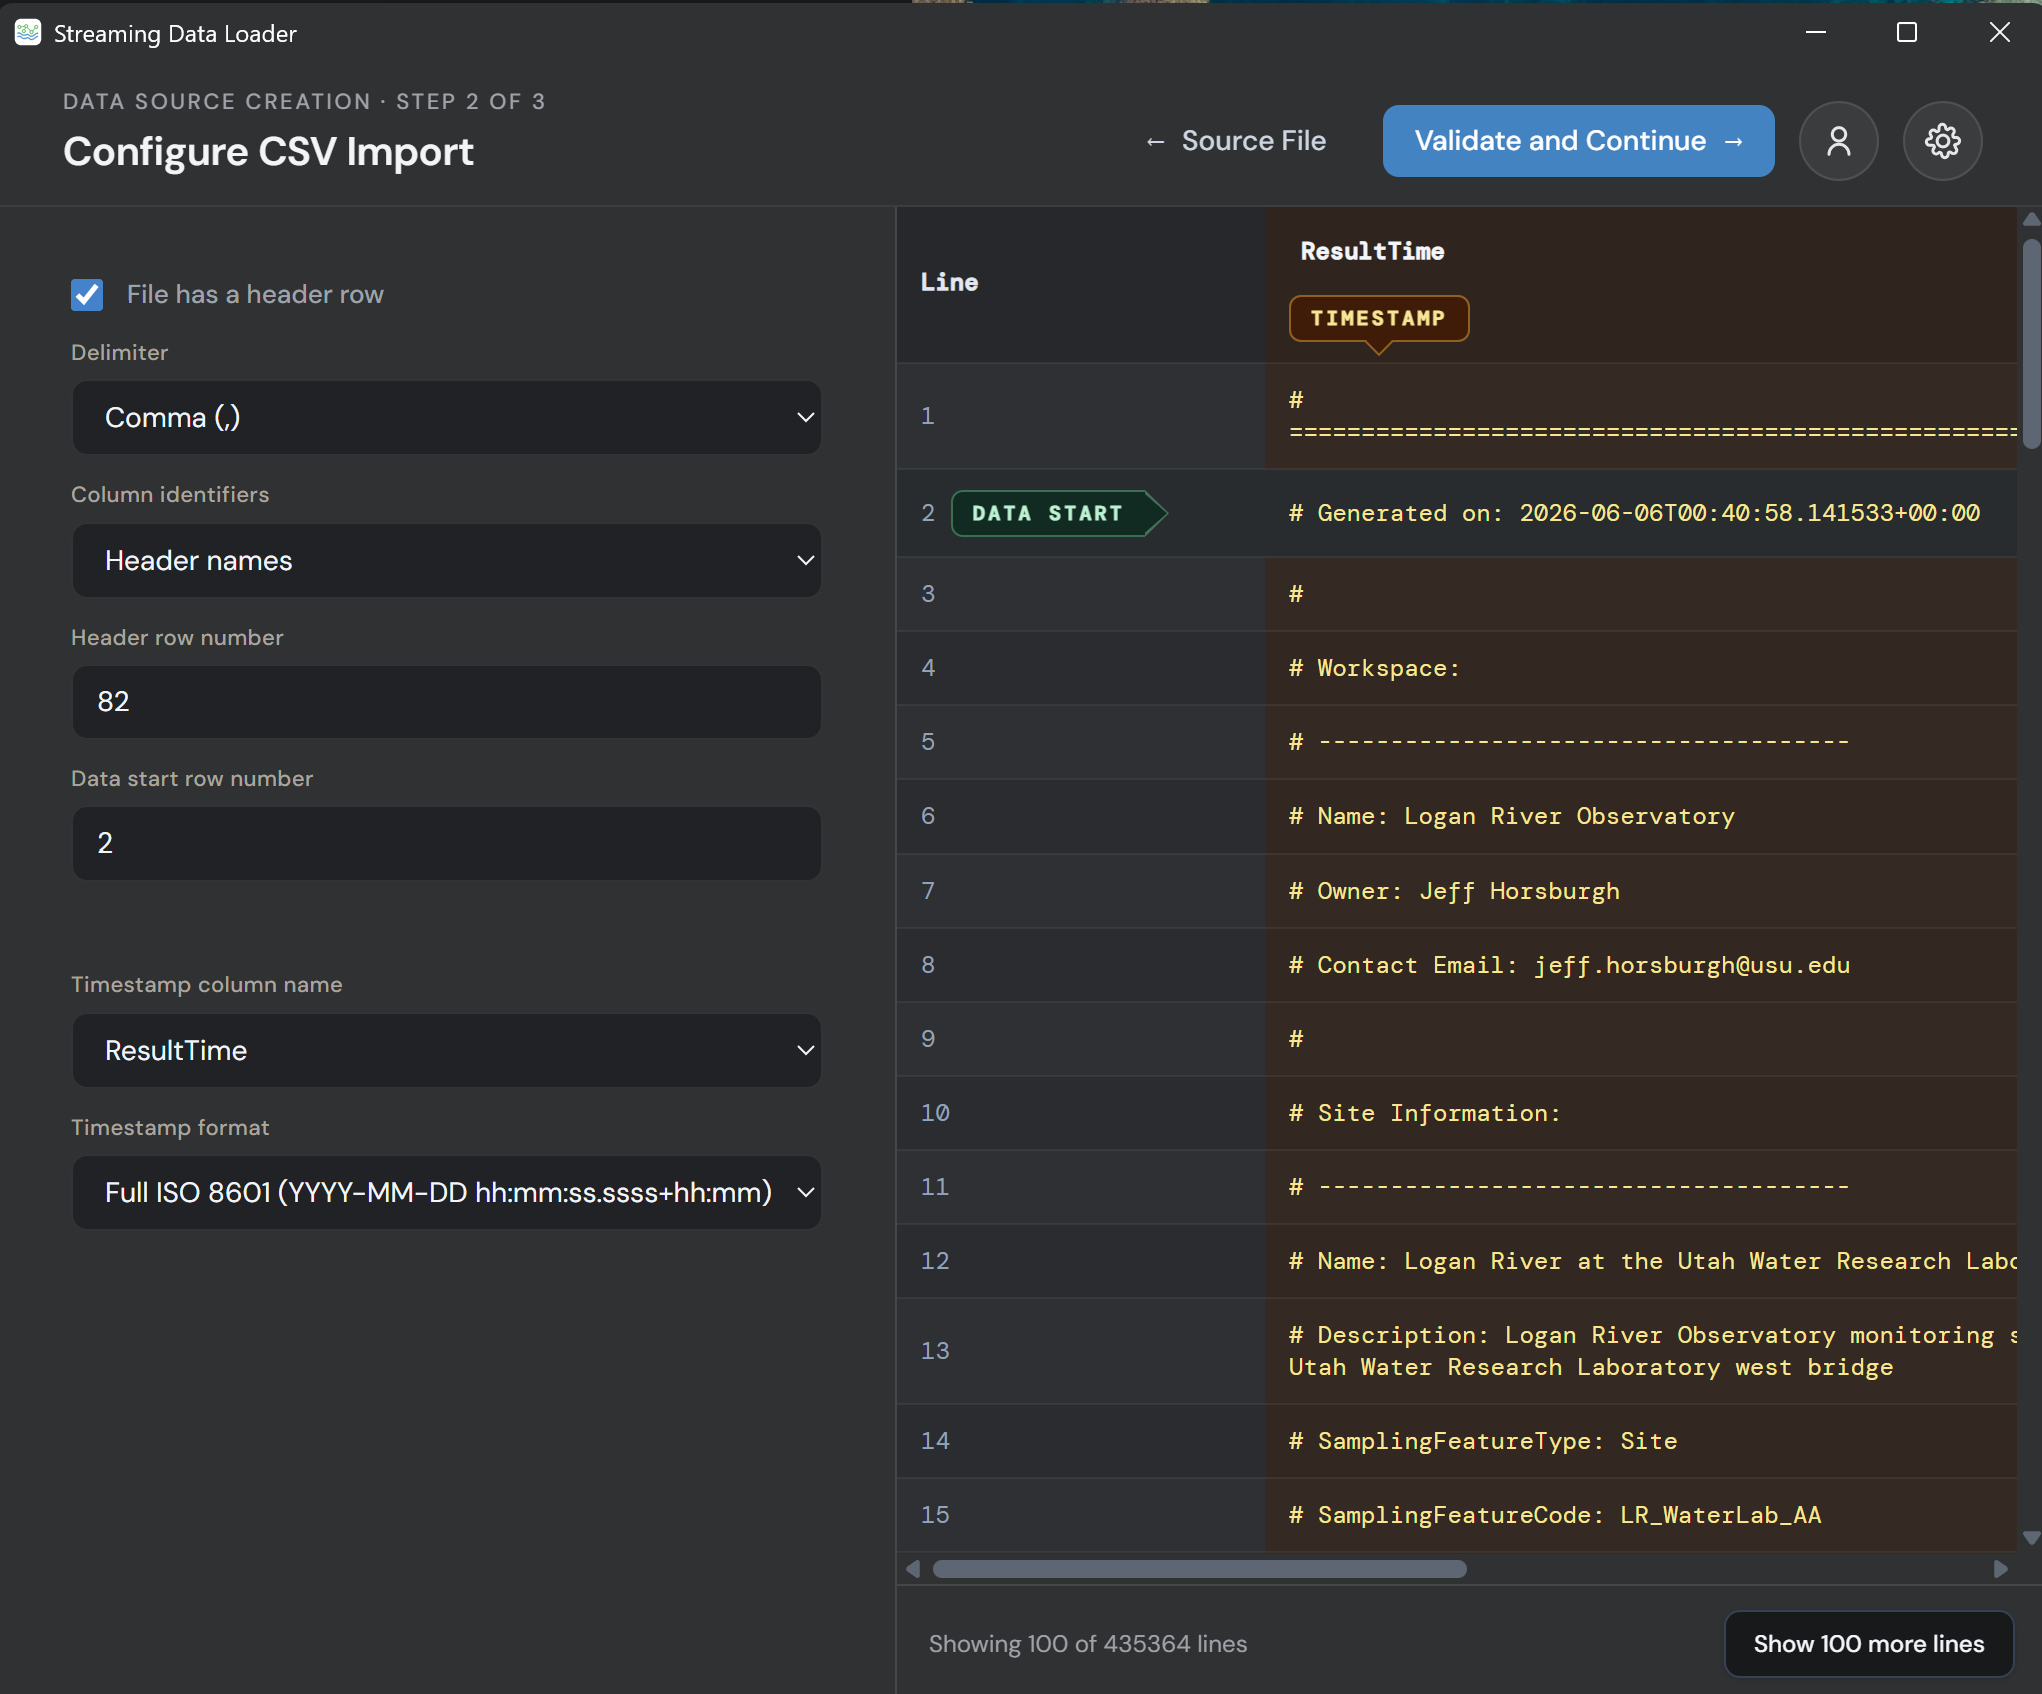
Delimiter
The delimiter is the symbol that separates the columns in the file.
For most CSV files, choose:
Comma (,)Other possible options include Semicolon, Tab, Pipe, or Space, but this depends on your file.
Column Identifiers
If your CSV file has column names, choose: Header names. This indicates that there is a row in your CSV file that contains the column headers and allows the app to use the names in that row to identify the columns in the table.
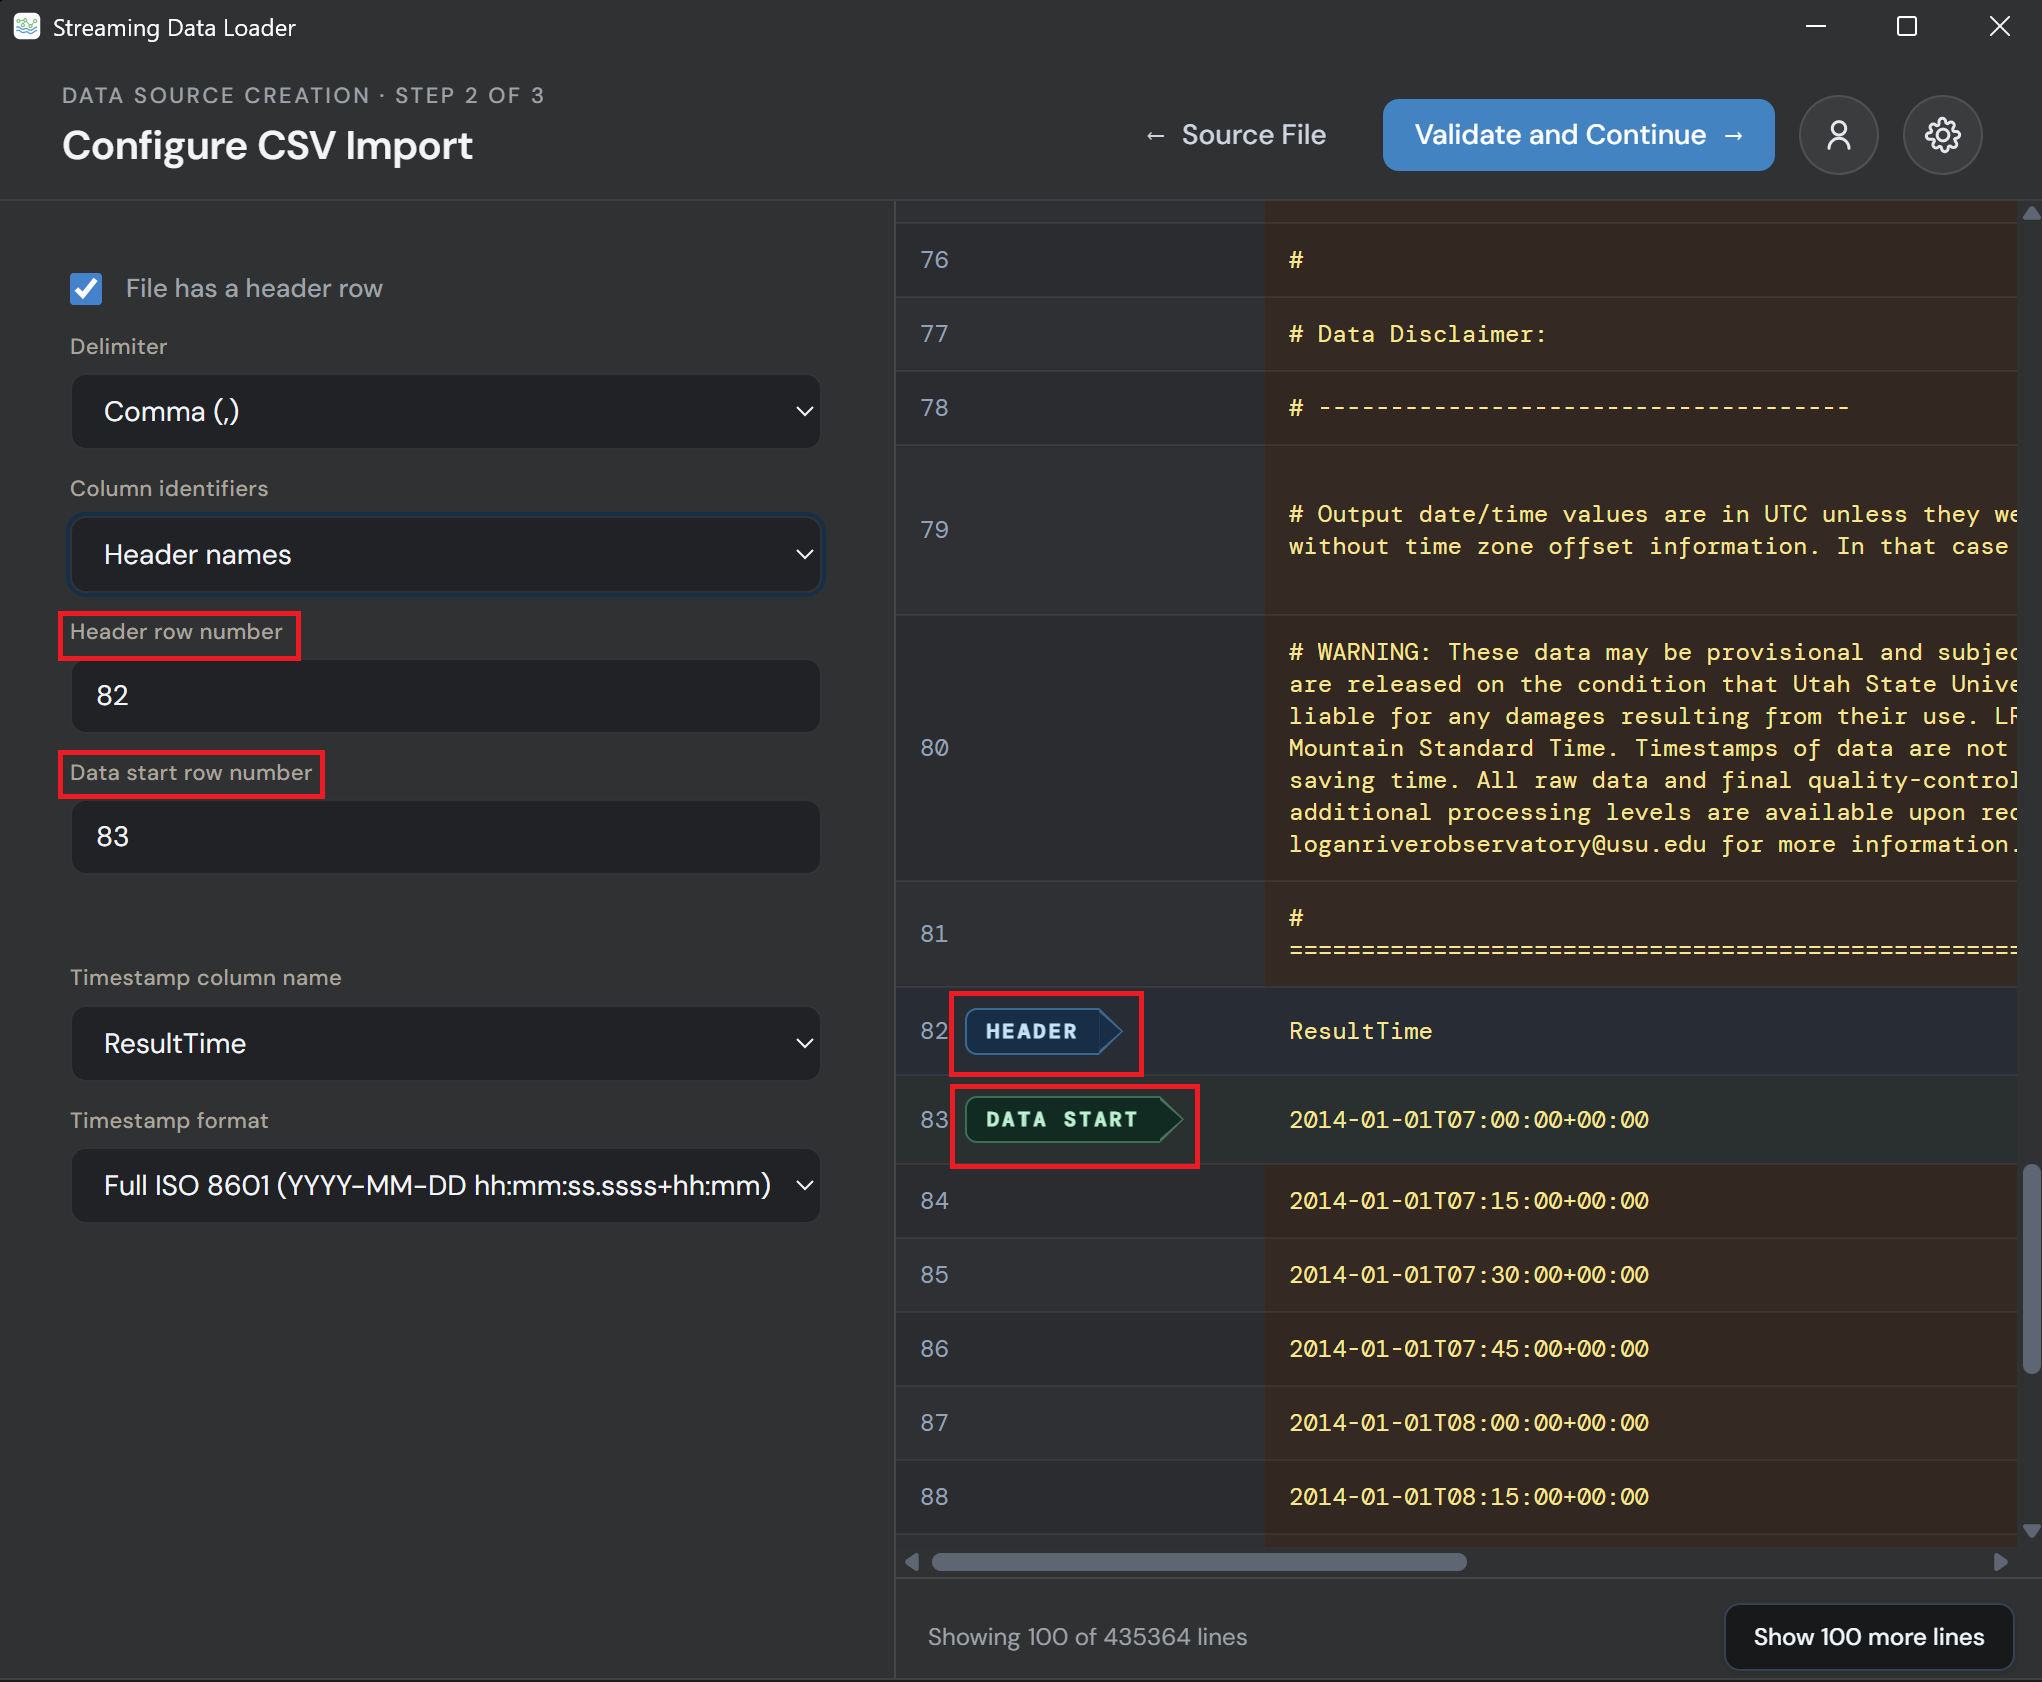
Header Row Number
The header row number is the row where the column names start. Move or drag the HEADER marker to the row where the column names are located. You can also set the header row number in the settings on the left.
Data Start Row
The data start row is the first row where the actual data begins. Move or drag the DATA START marker to the first row of real data. You can also set the number of the row where the data starts on the left.
Timestamp Column Name
Choose the name of the column that contains the date and time values for your data. The SDL assumes that your datetime values are in a single column. You can use different formats for the timestamps, but they must be in a single column in the file.
Timestamp Format
Choose the timestamp format that matches the timestamps in your CSV file. If the timestamp format is different, choose the closest option, or define a custom format that matches your timestamp values.
Timezone
HydroServer stores all data values within its database using UTC datetimes. If you do not specify a timezone associated with your data, HydroServer will assume that the values you are providing are UTC datetime values. For the timestamp format, you can choose the following options:
- Timezone naive (YYYY-MM-DD hh:mm:ss): You should use this option if your timestamps are UTC but do not encode the UTC offset information in the timestamp OR if your timestamps are recorded in another time zone that is not encoded in the timestamp values. In both cases, select the correct timezone corresponding to your timestamp values.
- Full ISO 8601 (YYYY-MM-DD hh:mm:ss.ssss+hh:mm): You should use this option if your timestamp values include the UTC offset information within the timestamp values (e.g., "+hh:mm").
- Custom Format: You should use this option if your timestamp values do not conform to the ISO 8601 standard format. You will need to specify the specific format of your timestamp values so they can be parsed, and you also need to specify the time zone associated with your timestamps.
NOTE: When using the Timezone naive option, you will also have to specify whether your timestamps have a fixed offset (e.g., your datalogger was programmed to always record timestamps using Mountain Standard Time) or whether they adjust for daylight saving time.
When everything looks correct in the setup for your file, click: Validate and Continue
9. Match CSV Columns to HydroServer Datastreams
After the CSV file is validated, the app will show a mapping page. This step connects the columns in your CSV file to the correct HydroServer datastreams into which those columns will be loaded.
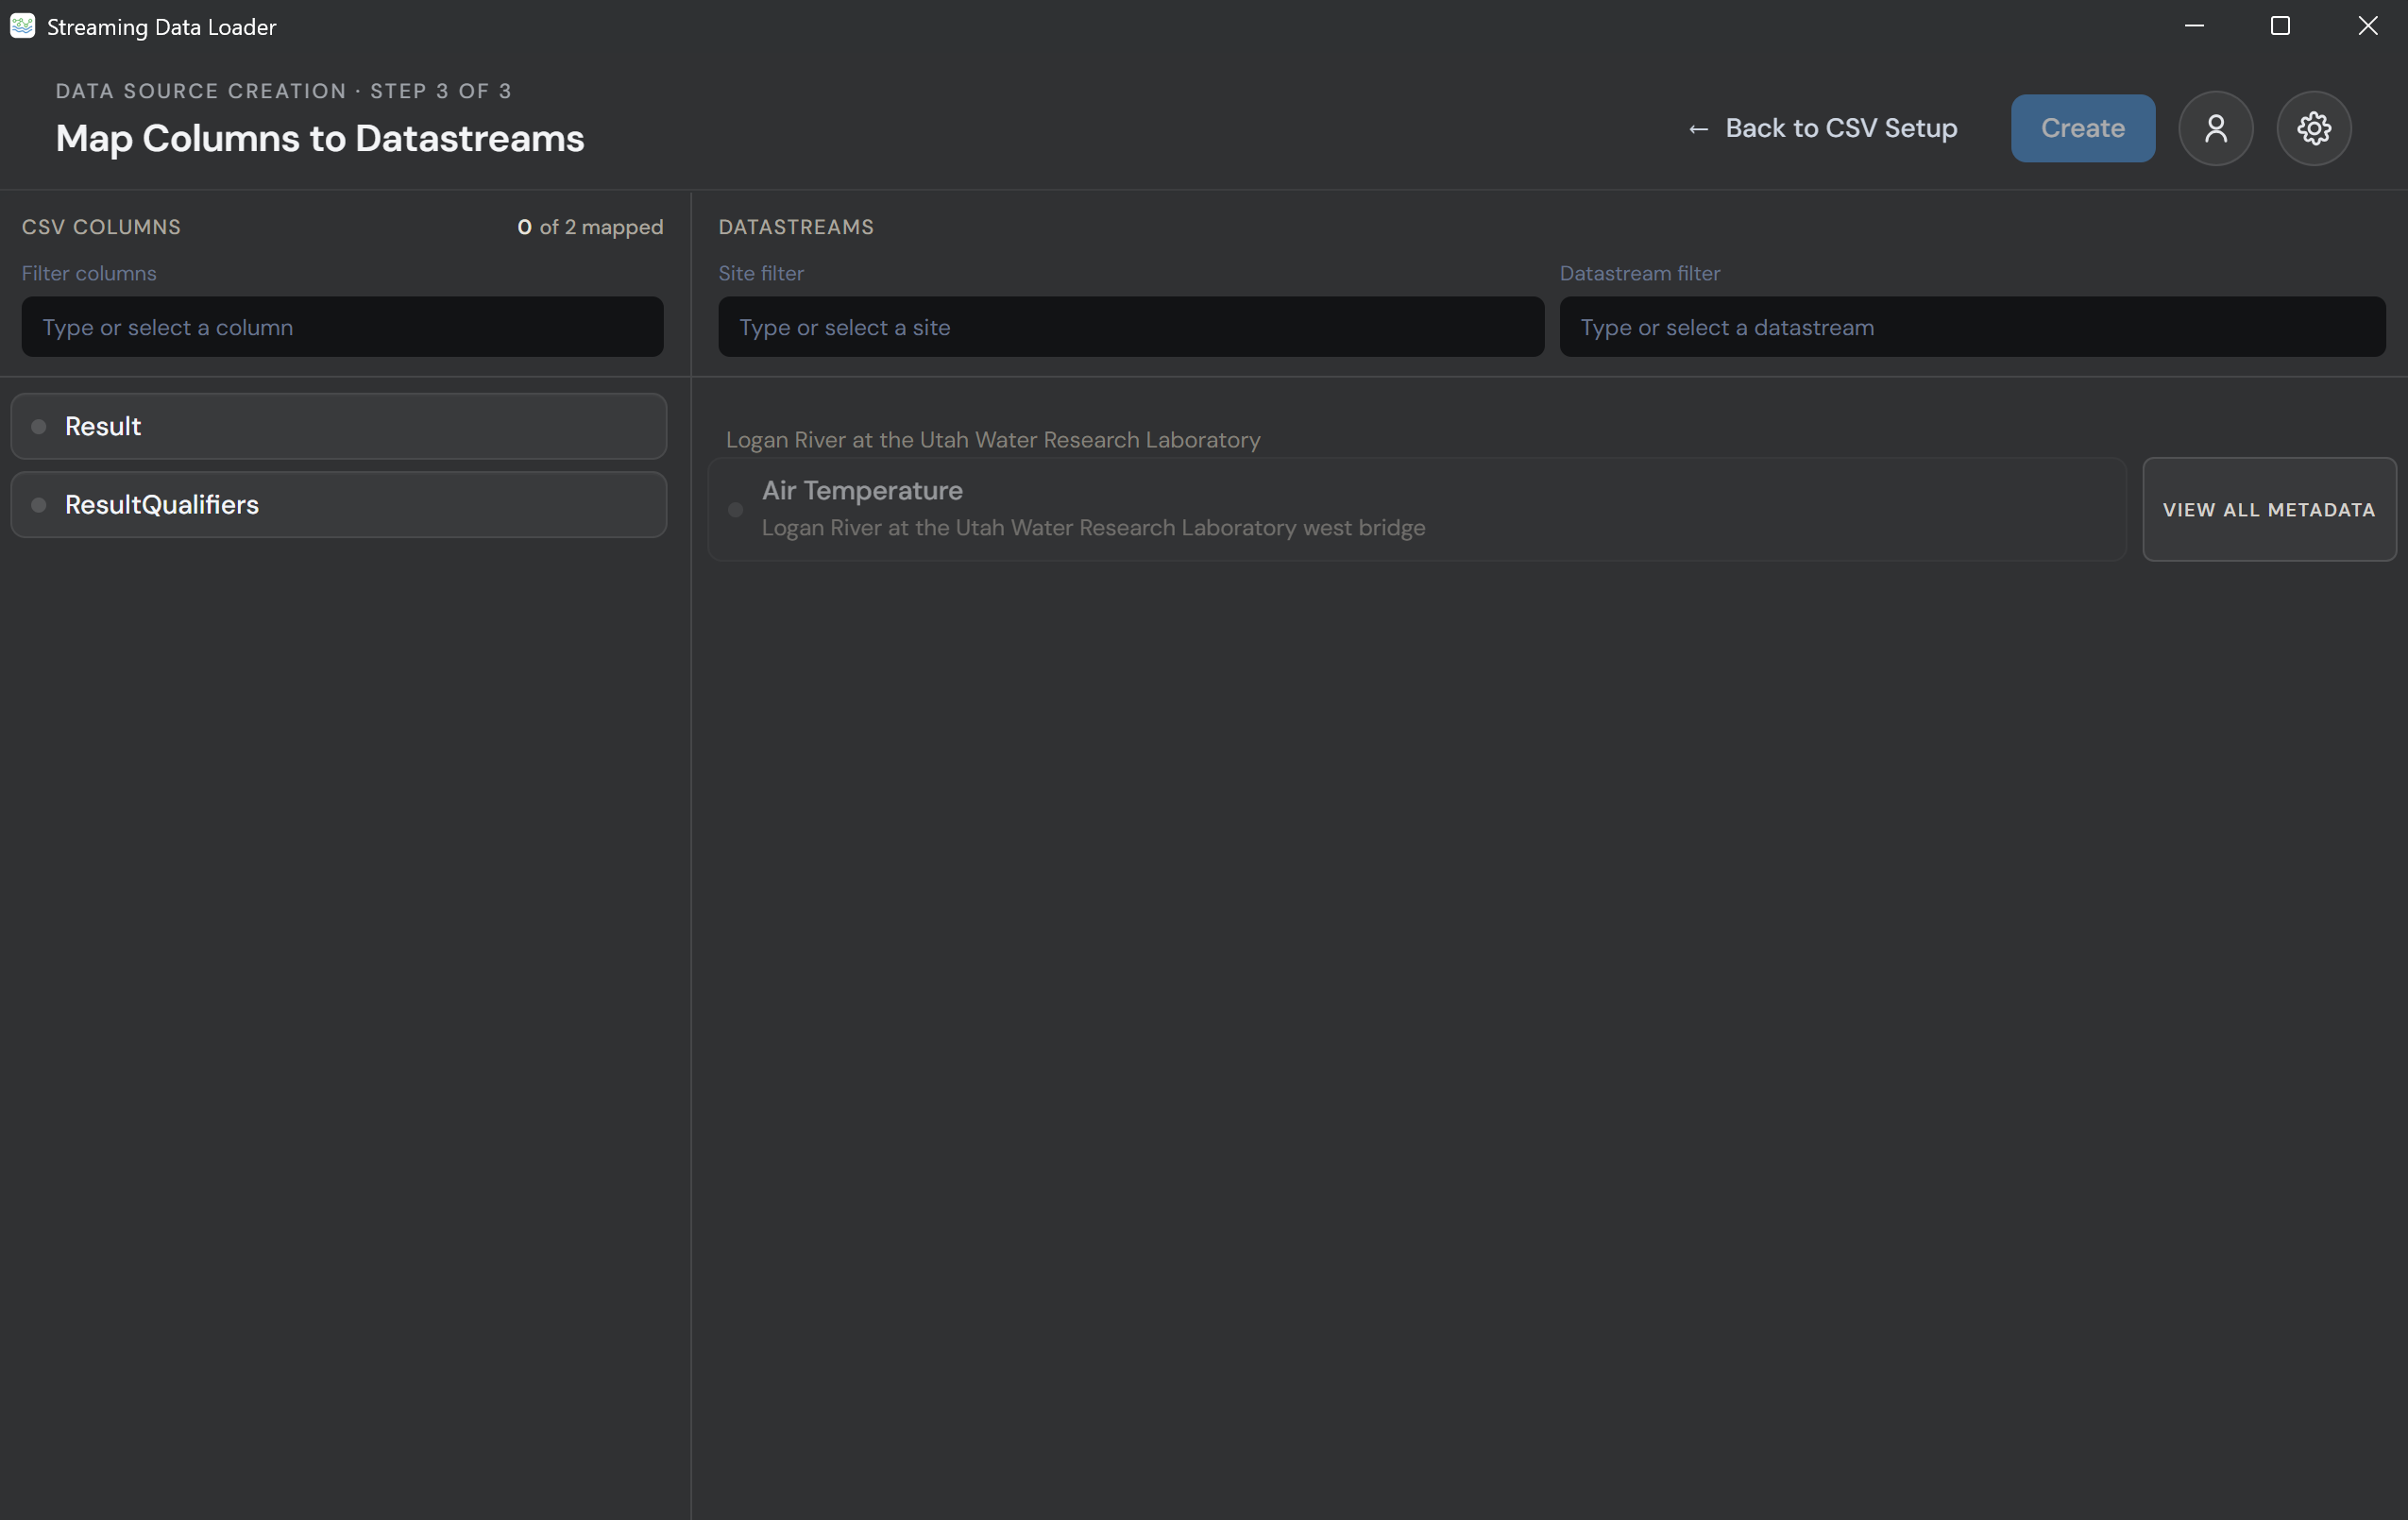
You need to select:
- The CSV column that contains the data values you want to load.
- The correct HydroServer datastream into which you want to load data.
IMPORTANT NOTE: You must set up the metadata for the datastream in the HydroServer Data Management App or using HydroServer's API before you can load data into it. To help you isolate the correct datastream when there are many available monitoring sites, you can use the Site and Datastream filters at the top of the form to narrow the list of datastreams for selection.
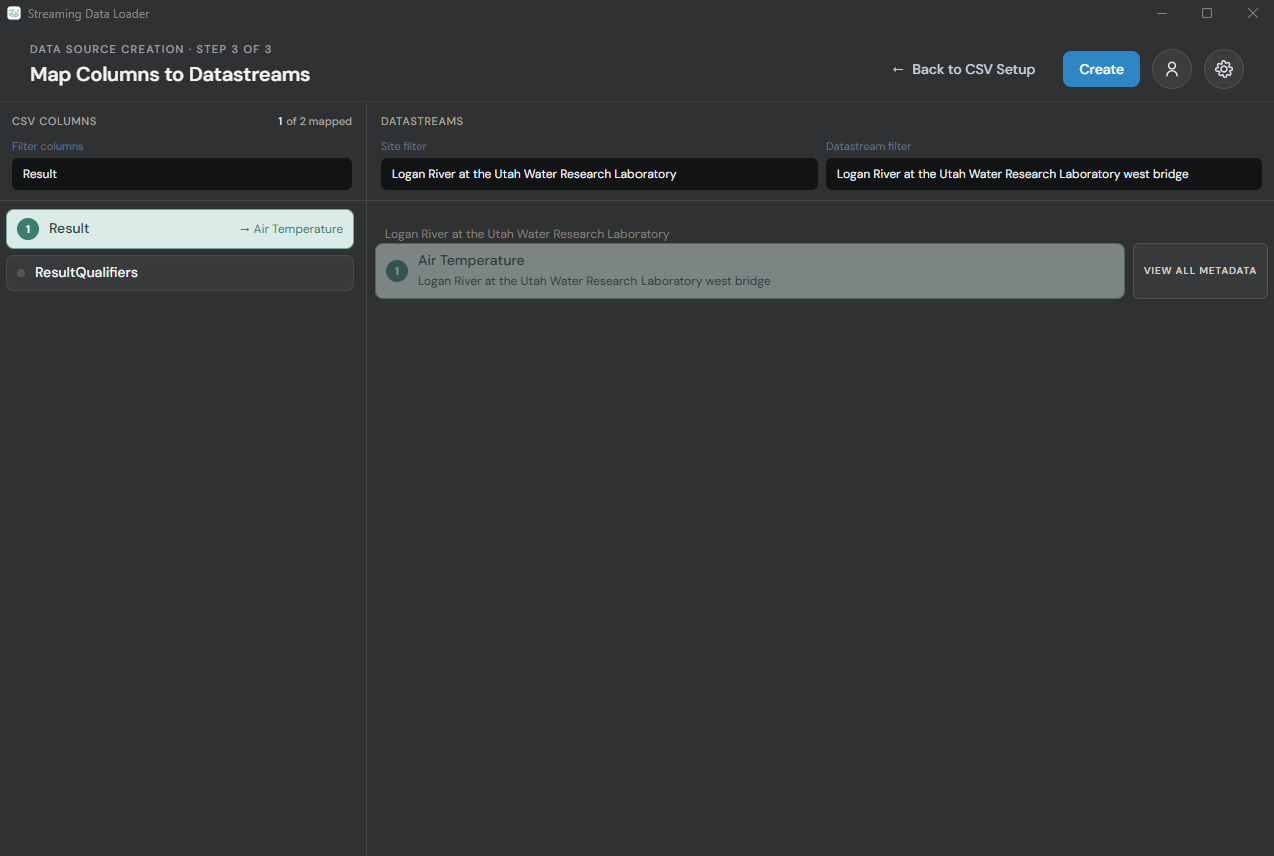
Example:
- CSV column:
max_temp_c - Site:
Logan River at the Utah Water Research Laboratory - Datastream:
Temperature
If you are uploading discharge data, the setup may look like this:
- CSV column:
Discharge - Site:
Logan River at the Utah Water Research Laboratory - Datastream:
Discharge
Make sure the selected CSV column matches the correct datastream. For example, do not connect temperature data to a discharge datastream.
NOTE: You can create as many mappings as you need within your data file. You can load data for one or many columns.
10. Create the Data Source
After selecting the correct CSV column, site, and datastream mapping(s), click: Create
This creates the data source and starts the upload process. After this, the Streaming Data Loader will begin sending the CSV data to HydroServer.
NOTE: If you need to modify the file location, CSV Setup, or column/datastream mappings, you can click on the buttons for those items under the name of the data source to edit the settings.
11. Check the Upload Status
After clicking Create, the app will take you to the dashboard. The dashboard shows the data sources you have created. If the status says:
Runningthe data is still being uploaded.
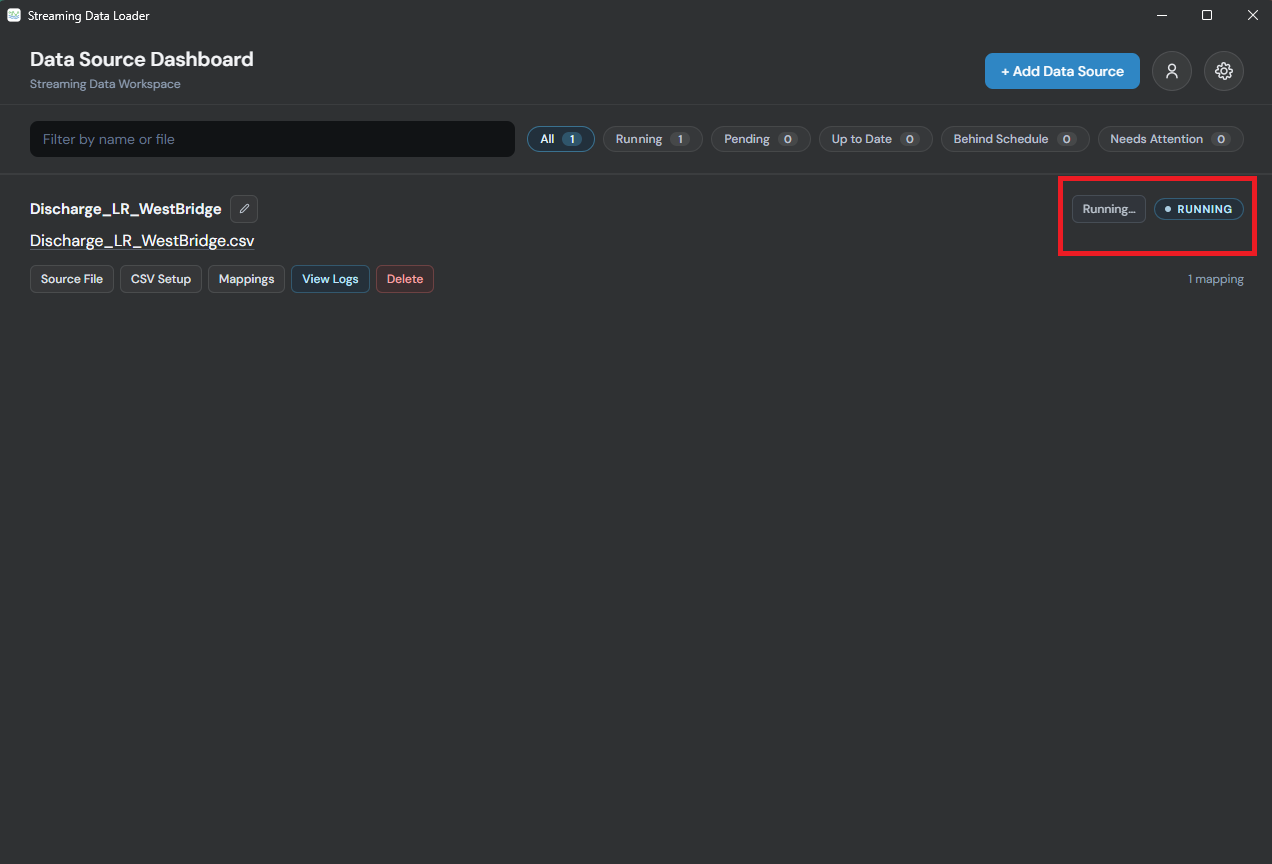
You can click: View Logs to check whether the upload is working correctly. If something is wrong, the logs usually show a message explaining what needs to be fixed.
12. Check the Data in HydroServer
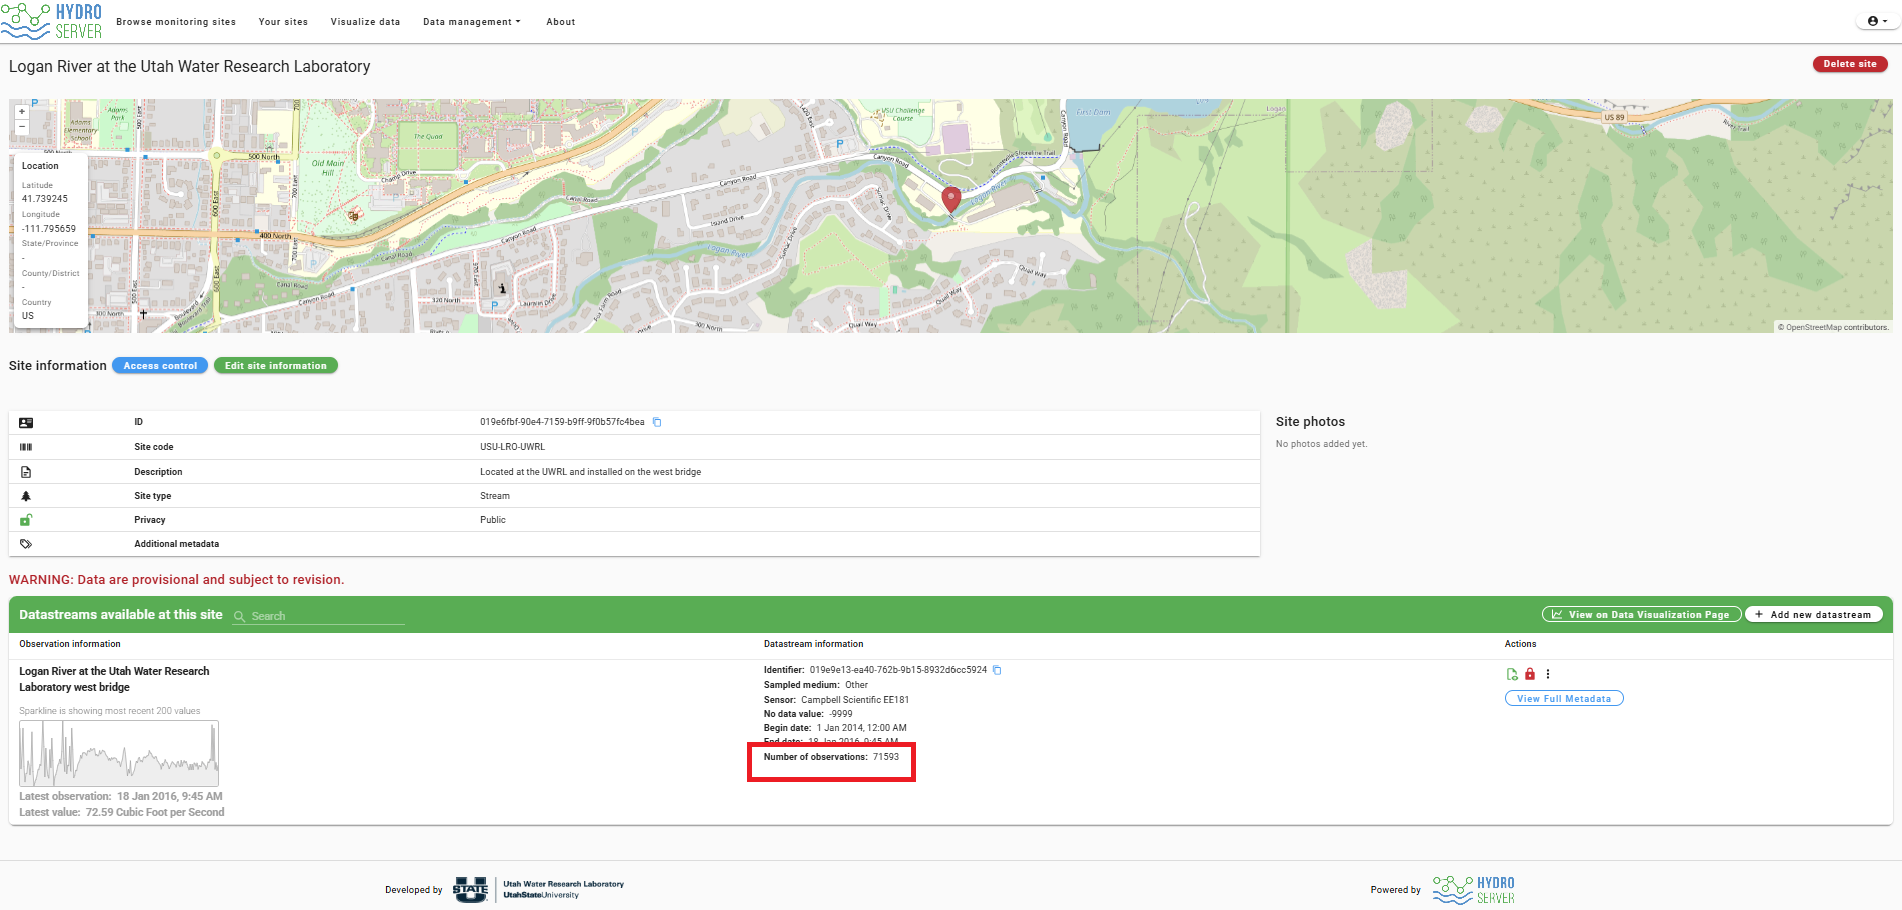
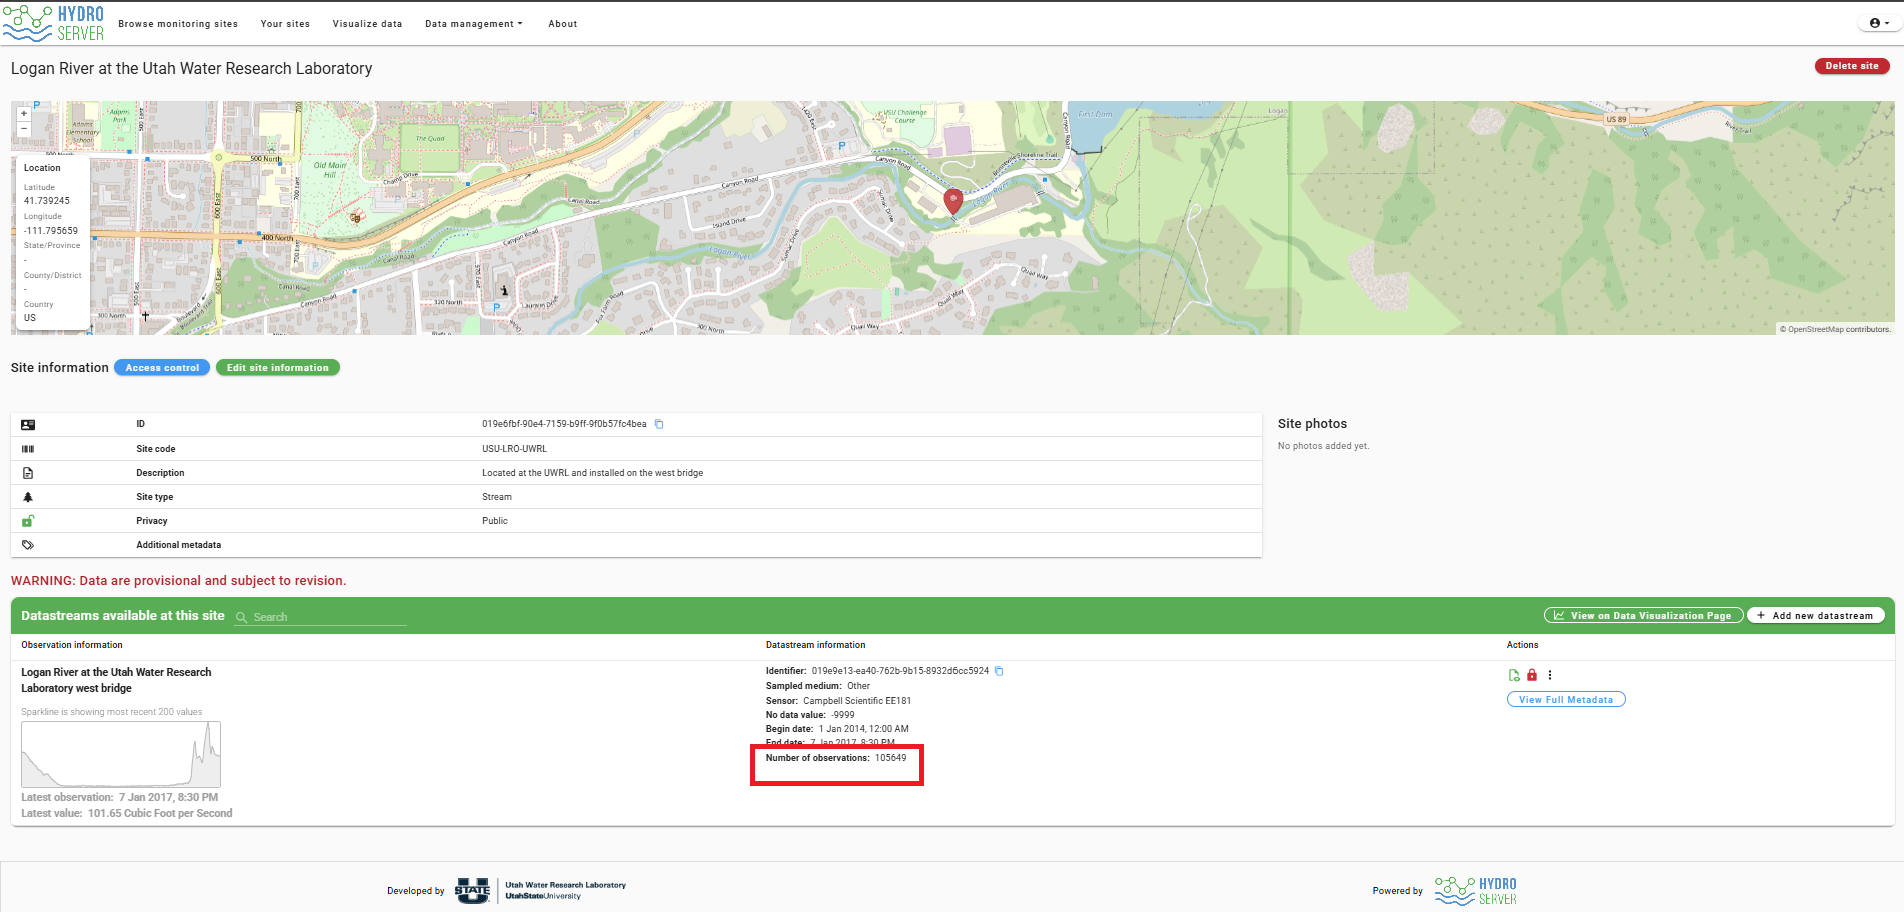
While the Streaming Data Loader is uploading the data, open the HydroServer Data Management App in your web browser. Go to the site details page for your monitoring site and refresh the page. If the upload is working, the number of observations in the datastream should increase. This means the data is being loaded successfully.
13. When the Upload Is Finished
When the upload is complete, the Streaming Data Loader will show:
UP TO DATE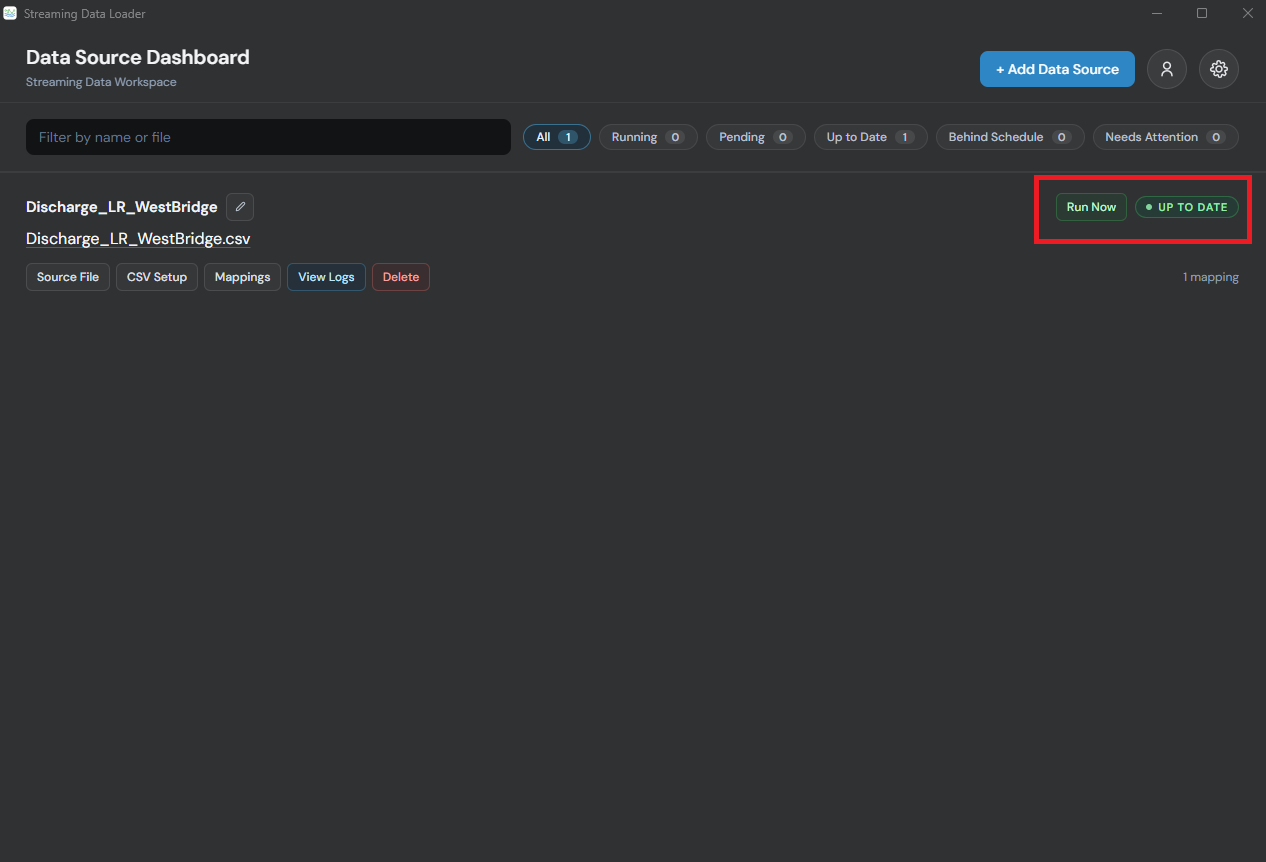
This means the CSV file has been uploaded to HydroServer. If new rows are added to the CSV file later, the Streaming Data Loader can detect them and upload the new data automatically. If you want to force a data source to run, you can click the "Run Now" button.
14. Visualize the Data in HydroServer
After the data is uploaded, you can view it in HydroServer.
To visualize the data:
- Open the HydroServer Data Management App website.
- Go to the Visualize Data page.
- Use the workspace filter to find your workspace.
- If needed, use the site filter to narrow the list of datastreams to the site you are interested in.
- Select your datastream from the datastream table.
- View the uploaded data as a time-series plot.
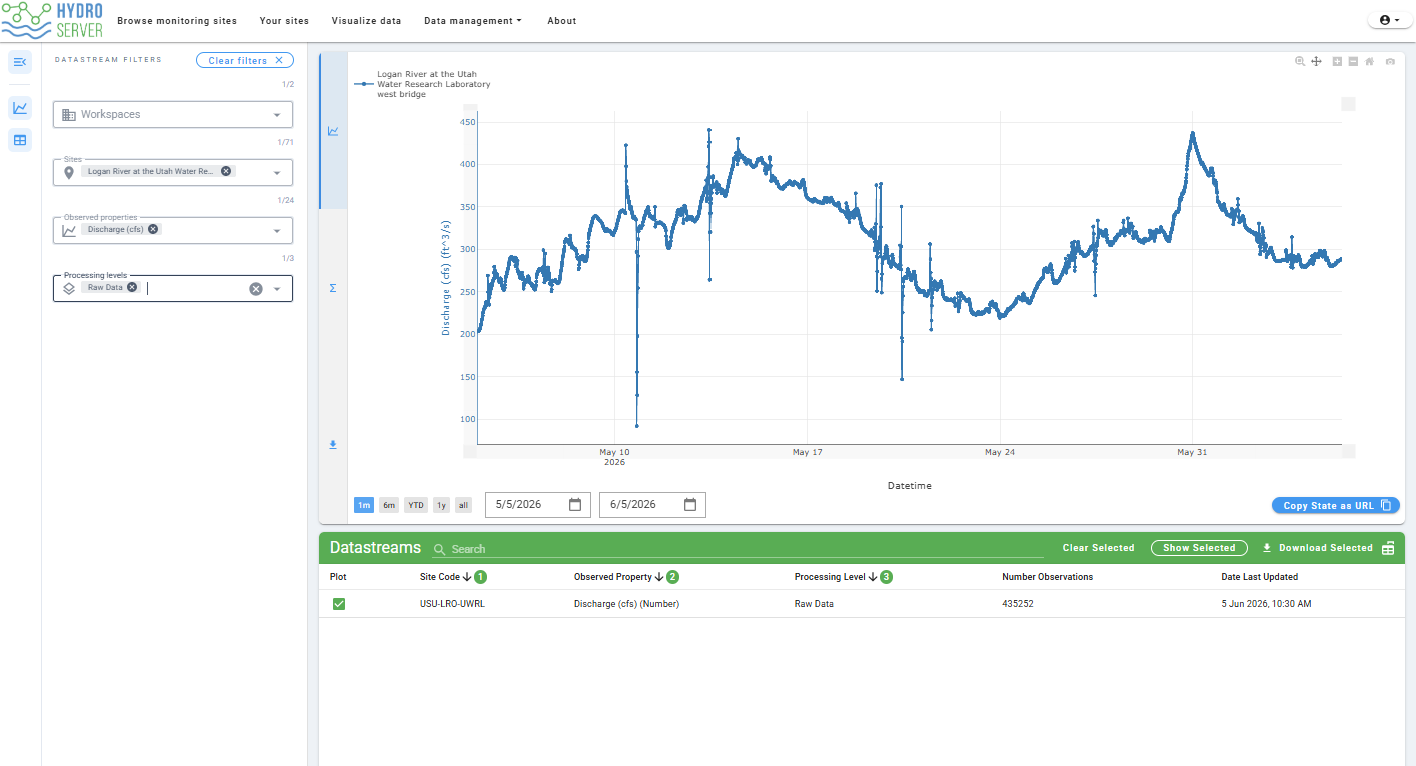
You should now be able to see your uploaded data in the HydroServer Data Management App.
15. Change the API Key
If you need to upload the data in a different workspace:
- Open the Streaming Data Loader.
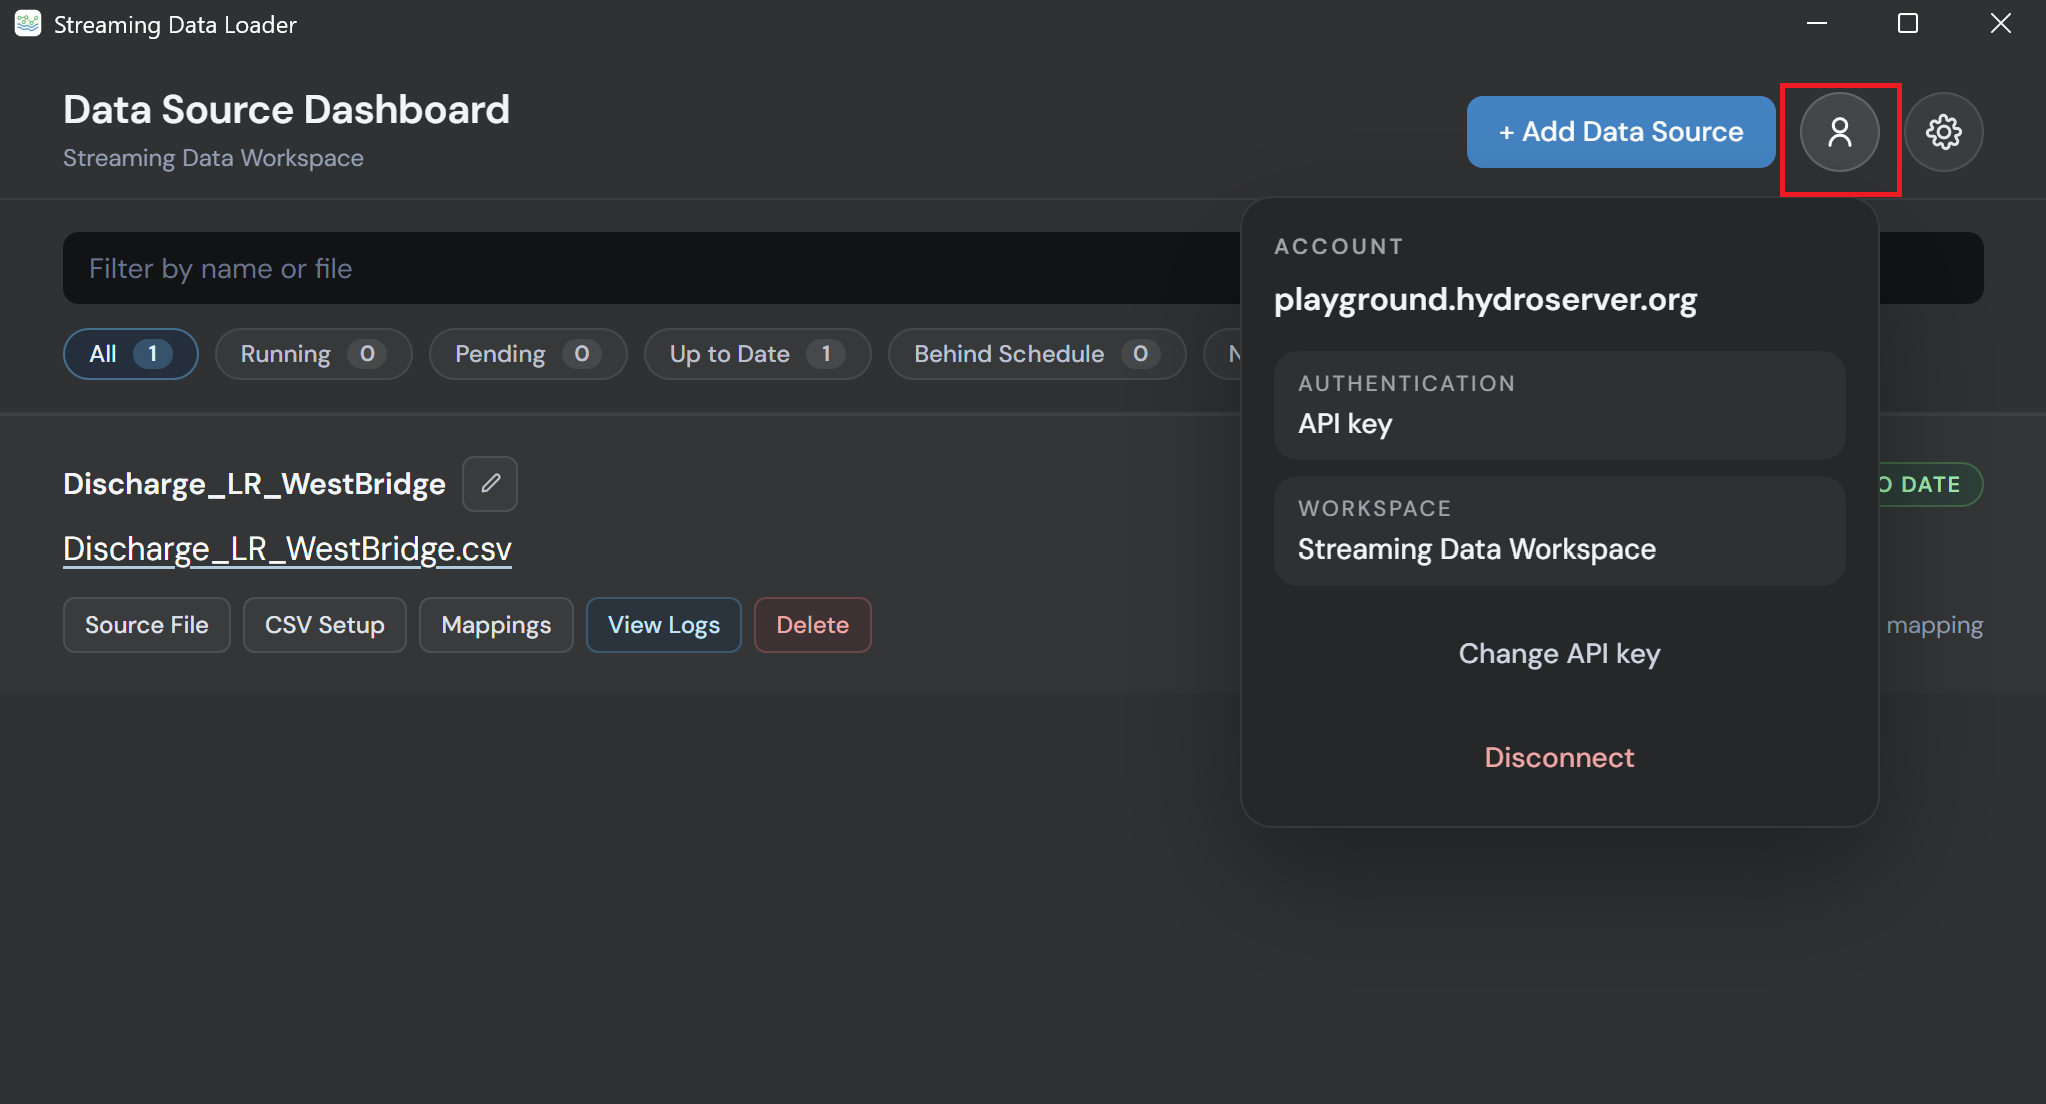
- Click the account icon in the top right corner.
- Click the "Change API key" option.
- Enter the new API key.
- Reconnect to HydroServer.
16. Disconnecting from HydroServer
If you want to disconnect the Streaming Data Loader from HydroServer, do the following:
- Open the Streaming Data Loader.
- Click the account icon in the top right corner.
- Click the "Disconnect" option.
17. Uninstalling the Background Service
If you are done with the Streaming Data Loader and no longer want the background service to run on your computer, do the following to uninstall it:
- Open the Streaming Data Loader.
- Click the Settings icon in the top right corner.
- Select "Uninstall Background Service."
If you want to use the Streaming Data Loader again on your computer, you will need to reinstall the background service.
NOTE: The Streaming Data Loader only runs data sources for one workspace at a time. If you disconnect the Streaming Data Loader, and connect to a different workspace, your data sources for the first workspace are saved, but they will not load data unless you reconnect the app to that workspace.